Plan Object
This section describes the purpose of the Plan object and its properties. Below you will find a general overview, followed by a detailed description of Plan Properties, as they appear in the various Plan categories (tabs).
A Plan is one of three objects that are ActiveBatch containers. The other two containers are Folder objects and the root of the Job Scheduler. These are the three places that store ActiveBatch objects created by a Job author.
A Plan typically consists of two or more related Jobs, although technically it can be used to store just one Job. In addition, all other object types can be added to a Plan (nested Plans, shared objects, and Folders). Using a Windows file system analogy, a Plan would be like a Windows folder, since an ActiveBatch Folder is where you store objects. However, a Plan is more than just a container, as outlined in the key points section below. It is not a requirement to create a Plan in ActiveBatch in order to run a Job. But many customers use Plans, since Plans allow you to create simple or complex workflows for related Jobs, where oftentimes you need to set the order in which the Jobs in the Plan will run. Jobs in a Plan can be set to run in parallel, when the Plan is triggered, or they can be set to run sequentially, one after another. It could also be a combination of both.
A key benefit when using Plans is you can quickly see and monitor all the related Jobs in the Plan (for example, in the Instances Pane pane and/or in the Daily Activity view) and check on their statuses (e.g. how they ran - successfully, etc.). For example, you may have 3 Jobs in a Plan. The first Job downloads a file from an FTP server, the second Job processes the data in the file, and the third Job archives the previously downloaded file. These Jobs will run sequentially. When the Jobs are done executing, the Plan is also marked complete.
To create a Plan, right-click on the desired container (Scheduler root, existing Folder or Plan) in the Object Navigation Pane, select New, then select Plan. When you’ve completed the Plan property settings, you must click the Save or the Save and Close button to save the Plan. Click the X on the tab of the New Plan if you wish to cancel the creation of the Plan. When you save the Plan, it will instantly appear in the Object Navigation pane (if auto refresh is enabled). To modify an existing Plan, right-click on the Plan in the Object Navigation pane, then select Properties.
Below are some key points about Plans:
-
Think of a Plan as a wrapper around your related Jobs and perhaps the shared objects used by the Plan and its Jobs. Placing shared objects within a Plan provides a form of isolation. For example, if you place a Queue or User Account object within a Plan, you eliminate its visibility outside the Plan. Users traversing the Object Navigation tree need to be granted List/Connect rights to see the contents of a Plan.
-
A Plan helps you see the related Jobs as a single unit, and their statuses after completion. See the image below, which is a Plan named FTP BankA, depicted in the Daily Activity view. The Plan has been expanded to display its 2 Jobs. One of them succeeded, the other failed.

-
A Plan is a triggerable object, but it has no payload. Therefore, only its Jobs are sent to Execution Agents
 to run. Plan instances will go into an executing state, but they only remain in that state while their underlying Jobs are active. The Jobs in the Plan can be set to run in a specific order, if desired.
 -
You can set (define) variables on a Plan, and the child objects within the Plan that reference variables will be able to access them (the Plan variables will be within the child objects' scope). Plan variables can be passed to other related Jobs and Plans.
-
You can create a reference to a Plan
-
You can set security on a Plan so that child objects can inherit security from the Plan.
-
You can set default policies
on a Plan. -
You set audit policies
on a Plan. -
Plans can be managed as a whole (as opposed to managing each Job within the Plan). For example, you can restart an existing Plan instance.
-
Plans share many of the same properties that Jobs have. For example, Plans (like Jobs) can be configured to:
-
Run on a schedule
-
Not run on a holiday
-
Trigger other Jobs or Plans when complete
-
Have alerts sent out (e.g. on Plan failure)
-
Adhere to SLA's (Service Level Agreements)
-
-
You can connect to a Plan using ActiveBatch's Virtual Root
feature, although as a best practice, it is recommended you use the Folder object instead.
Note: To learn about how to best set up objects in the Object Navigation pane, see this topic: Organizing ActiveBatch Objects. See the Object List object for more information when you need to associate one or more objects within one or more Jobs or Plans.
Note: The Plan object was introduced before the Folder object. This resulted in some customers occasionally using a Plan object strictly for organizational purposes, not to be triggered. After the introduction of the Folder object, using the Plan in this manner was no longer recommended. As a best practice, use Plans to create triggerable workflows, and use Folders for organizational purposes.
The image below depicts the General category of an existing Plan.
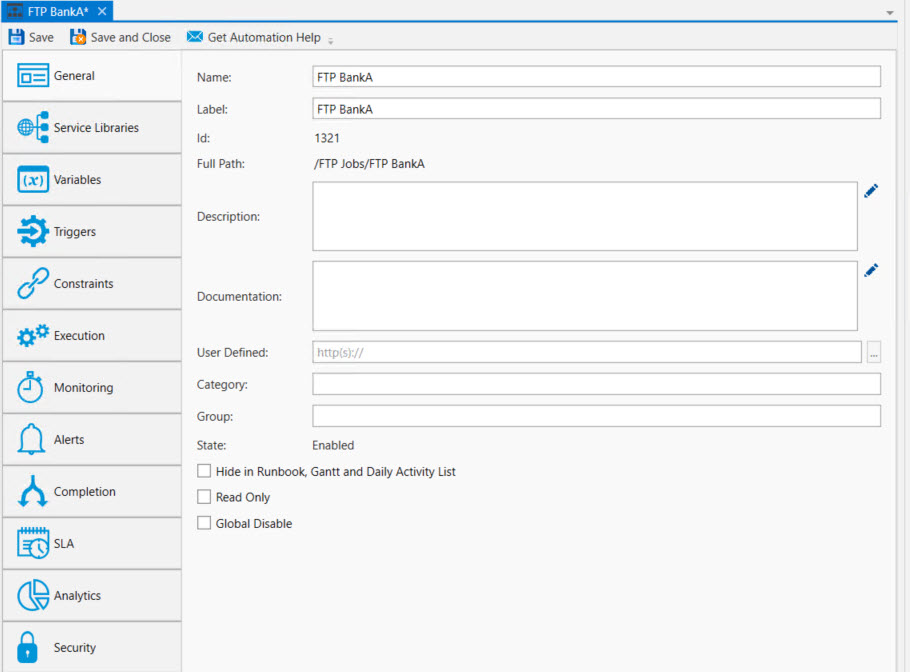
General Properties
Name: This mandatory property represents the name of the object. The name is limited to 128 characters. The object’s name should be unique to avoid confusion. We recommend that it also be somewhat descriptive so it’s easy to find. The name is used (by default) to identify the object in the Object Navigation pane and other places in the UI. This can be changed to the label, if desired. See "Display Mode" in the General Settings
Label: Every object must be uniquely labeled within the scope of the namespace. The label is limited to sixty-four (64) characters. The label is typically the same value as the name (it is auto-filled to match the name you enter); however, uniqueness is always enforced for an object’s label. The label is recorded in the ActiveBatch namespace. The characters that may be used for the label property are restricted to alphanumeric (A-Z, a-z, 0-9), space, period (.), dash (-) and underscore (_). The label itself must begin with an alphabetic character. The label is typically used when scripting. All searches are case-insensitive. ActiveBatch does allow you to search for objects using either the label or the name properties.
ID: This is a unique read-only number that can be used to retrieve the object. Is it assigned by the system when a new object is saved.
Full Path: This read-only property provides the full namespace specification of the object. It consists of the container(s) the object has been placed in, with the object’s label appended to the end. For example, the fullpath: /IT Jobs/Nightly Run/<object label>, is such that IT Jobs is a root-level Folder, Nightly Run is a Plan, followed by the label of the object you are creating.
Description: This free form property is provided so you can document and describe the object to others. The description is limited to 512 characters. Clicking on the pencil icon will pull up a mini text editor where you can more easily enter your description.
Documentation: This optional field is used to denote a reference to the Plan in an operator’s runbook or other documentation concerning the running of the Plan (to a maximum of 80 characters). Clicking on the pencil icon will cause a mini text editor to appear.
User Defined: This optional field can be set by the Plan’s author as free-form text (to a maximum of 128 characters). If you set this field as a URL (for example, a hot link to runbook information for this Plan) you can click the button on the right and launch your web browser with this field as a URL.
Category: This optional field is used to categorize the Plan (to a maximum of 64 characters).
Group: This field is not used and is obsolete (it is maintained for backward compatibility purposes only). Plans are now used to associate related Jobs. The maximum group name length is 64 characters.
State: This read-only field displays the state of the Plan. States include: enabled, disabled, soft disabled and held.
Hide in Runbook, Gantt and Daily Activity List: This checkbox indicates whether you would like to hide this Plan in the views mentioned. This can be useful when you have a Plan that runs very often and would only clutter the usefulness of the other views.
Read Only: This checkbox, when enabled, means the Plan’s properties cannot be changed. You must have “Modify” access permission to the Plan object to set this feature. To clear the read-only attribute, uncheck the box.
Global Disable: This checkbox indicates whether the Plan is globally enabled for Reference Plan
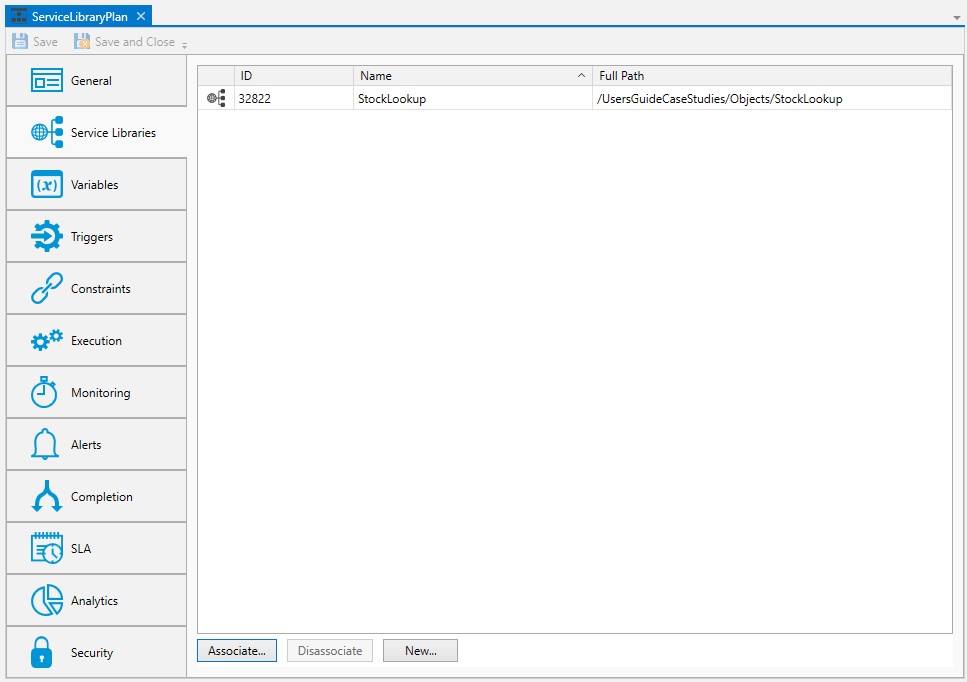
Service Libraries allow a Plan (and its underlying objects) to have accessibility to methods or APIs supporting a variety of API sources. The Service Library Object allows methods to be defined and reused within ActiveBatch. Ultimately the methods are deployed and used in a Jobs Library
Variables are one of the most important and powerful aspects of ActiveBatch. With variables you can pass data to other related Jobs as well as form constraints for proper execution of related Jobs.
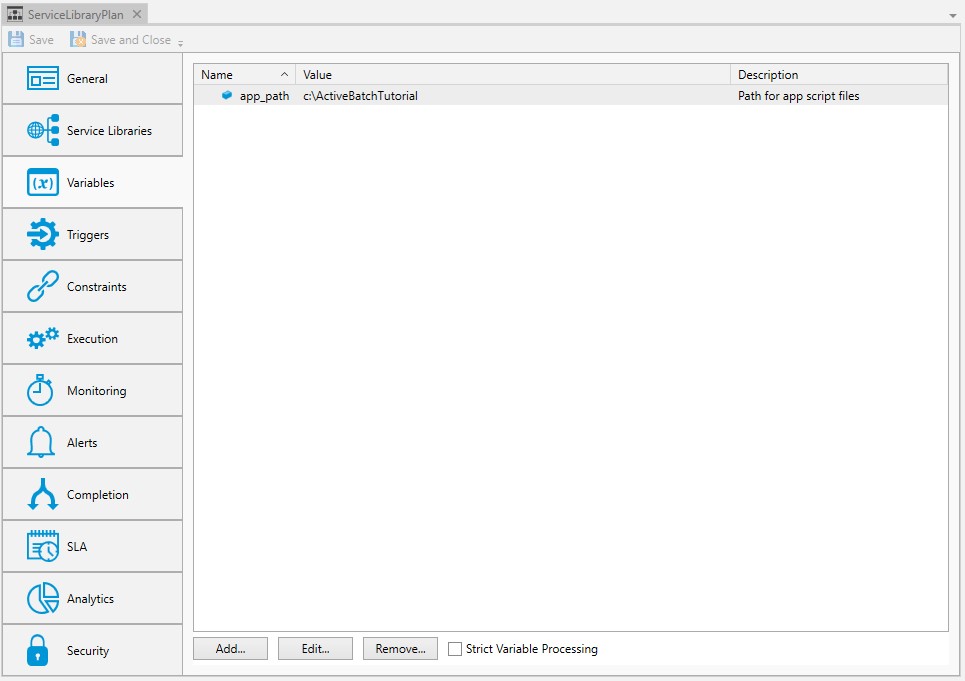
ActiveBatch variables represent data that can be passed to Jobs, Plans, programs or used anywhere variable substitution is supported within ActiveBatch. The image above displays the Variables property sheet of a Plan. The variables are displayed in a list. In the above image, a constant variable
For every variable you create on the Plan, there is an option to Export as Job Environment Variable. If checked, Jobs that have Inherit Environment Variables checked on their Variables property sheet will be able to use the Plan's variables as environment variables in the Job.
The checkbox Strict Variable Processing (also on the Variables property sheet), when checked, means that all active variables
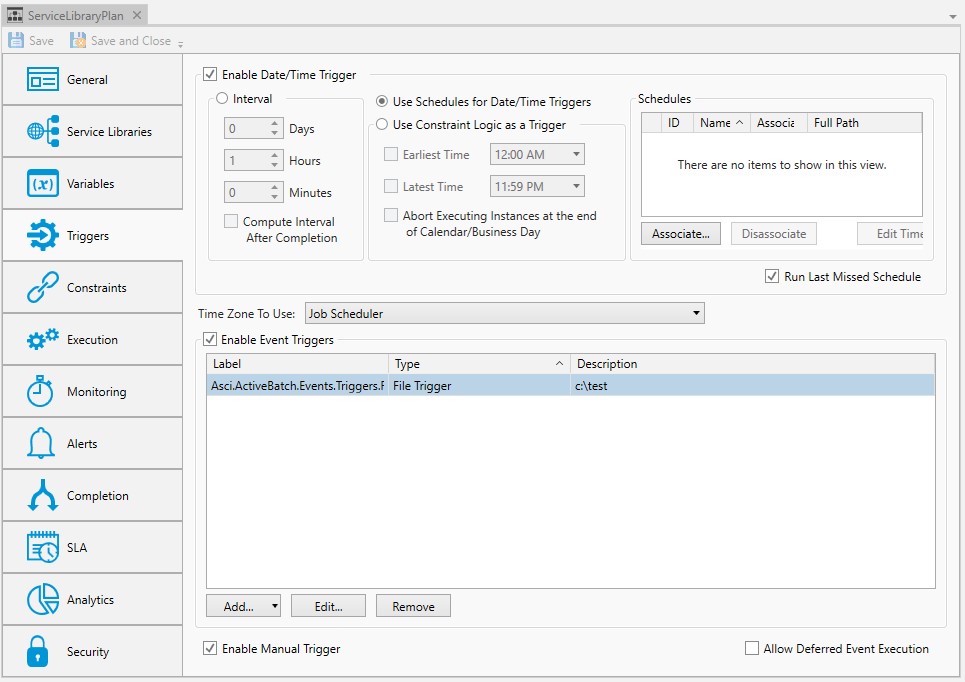
This section allows you to specify when a Plan should be triggered. This includes Date/Time triggers, which consists of a few options, including setting a time interval, associating one or more Schedule objects, or using constraint-based scheduling (CBS). Also configurable on the Triggers property sheet are a variety of event triggers. When a configured event occurs - for example, a file arrives in a directory being monitored by the Scheduler - the Plan will trigger).
Scheduled Triggers
Scheduled triggers are configured on a triggerable objects' Triggers property sheet. Triggerable objects include jobs, plans and references.
ActiveBatch supports (3) types of date/time scheduling:
Interval - Configure trigger times using an interval that includes days, hours, and minutes, or a combination thereof. For example, trigger a Job every 45 minutes.
Schedule - Obtain trigger dates and trigger times from a Schedule Object. The time can also be configured on the triggerable object, which when doing so, ignores any times set on the associated Schedule object. For example, trigger a Plan Monday and Wednesday at 2pm and 6:15pm.
Constraint-based triggers (CBS) - Obtain trigger dates from a Schedule object. The trigger time comes from a CBS-specific property that has a default time that can be overridden with a time of your choosing. All General Constraints configured must evaluate to true before the triggerable object can run. For example, trigger a Job reference Monday through Friday, and evaluate the constraints at the start of the calendar day (i.e. midnight). If the constraints are met, run the Job immediately. Note - CBS can only trigger a Job or Plan once a day. Use other methods if you need to trigger the object more frequently.
Note: For any of the 3 above-described date/time triggers to work, check the Enable Date/Time Trigger checkbox at the top of the Triggers property sheet.
Expand the desired Scheduled trigger type to learn more about it.
To schedule Jobs/Plans based on an interval, click the Interval option.
When looking at future runs for objects configured using an Interval, you will see a state of "Not Run (I)", where the I stands for Interval.
Interval allows you to enter a time expressed in days, hours and minutes. This “interval” is added to the starting execution time and forms the next time the Job/Plan is to be scheduled for execution. For example, let’s say the time is now 11:00am. An interval of 1 day, 1 hour and 0 minutes would result in a next scheduled execution time of tomorrow at 12:00pm , and so on.
Interval is useful as a relative expression of time and when an exact time is not needed. For example, an interval of 1 hour does not mean the Job /Plan will run on the hour but rather every 60 minutes.
The interval is calculated based on the creation time of the object that has been configured with this trigger method. For example, if a new Job is configured to run every 15 minutes, and the Job is saved at 2:10pm (the creation time), the Scheduler will begin to schedule future runs 15 minutes after 2:10pm. Therefore, the first trigger will be at 2:25pm. If the Job is modified, the original creation time of the Job is used to calculate future runs. For example, if the interval property is modified to run every 30 minutes, future triggers will be calculated based on the Job's original creation time of 2:10pm (not the modify time). Therefore, in this example, the first future run would be 2:40pm, the next at 3:10pm (providing the property "compute interval after completion" is not checked, described below).
The “Compute Interval after Completion” checkbox allows the Scheduler to compute the next time the Job/Plan is scheduled to run by adding the interval period when the triggerable object completes rather than when the triggerable object begins to execute. For example: assuming a ten (10) minute interval and a five (5) minute elapsed execution time, if an instance starts to execute at 12:00 and completes at 12:05 this checkbox will schedule the next occurrence at 12:15 rather than the default of 12:10.
Note: When using the Hours and/or Minutes interval option, the assumption is the Job/Plan will trigger 7 days a week every "x" Day, Hours and/or Minutes. If you wish to limit this (e.g. exclude weekends), you can add a Date/Time Constraint to the triggerable object. See Date/Time Constraints for more details.
To schedule Jobs/Plans using one or more Schedule Object, click the Use Schedules for Date/Time Triggers option.
When looking at future runs for objects configured using a Schedule, you will see a state of "Not Run (S)", where the S stands for a Scheduled trigger.
ActiveBatch supports very flexible date/time scheduling. Schedules objects can be shared among Jobs and Plans, and like all objects - are securable. You can schedule both pattern (e.g. every 2 hours) and nonpattern (e.g. 1:31 PM, 2:19 PM) time periods. Dates can be Calendar, Fiscal or Business dates.
At its simplest, Schedules consist of Date and, optionally, Time specifications. When only Date specifications are included, a Schedule will emit a series of dates. If Time specifications are included, the Schedule will emit both dates and times. However, the Schedule's time(s) will only be used on a triggerable object if the trigger object does not have the time embedded (set on the triggerable object itself). See below for more details.
It is a common scenario that many jobs and plans will run on the same days, but not at the same time. This means that you will typically want to create Schedule objects that contain Day/Date specifications - but not Time specifications. This way, a single Schedule can be shared by those related jobs and plans. The time the triggerable object runs would be embedded within the triggerable object. However, if you do have multiple triggerable objects set to run on the same dates and times, you can certainly add the time to the Schedule object. The Schedule's time is ignored if the time is set on the triggerable object.

The image above includes a schedule that is associated with a Plan. You will notice several action buttons along the bottom of the Schedules grid. Associate lets you select a schedule to use. Disassociate lets you disassociate a selected schedule (not use it anymore). Edit Times allows you to add/edit times associated with the triggerable object. when used, the times are embedded within the object. Edit Schedule allows you to edit the selected Schedule and make changes. New allows you to create a new Schedule, and when saved, it will automatically be added to the Schedules list.
As mentioned previously, you have a choice of embedding the trigger times as part of the object itself or set the times on the Schedule. Embedding times with the object provides more flexibility and allows more sharing of the Schedule object since many Jobs/Plans may share the same trigger dates, but not the same times.
For example, in the above image, a Schedule named Monday implies that the schedule will result in triggers every Monday. Observe that under the Associated Time column there is time specification present. This means that the time is coming from the Plan, not the Schedule object. The user clicked on the Edit Times button to embed the time on the Plan-level. When the words In Schedule are displayed in the Associated Time column, the trigger time(s) are coming from the Schedule object. In this example, the Plan is scheduled to run every Monday at 06:00, :15, :30, :45 and again at 07:00, :15, :30 and :45. The Plan's embedded time takes precedence over any times that may be set on the associated Schedule.
Creating a Schedule Object is straightforward in ActiveBatch. You just need to think about what kind of date/time triggers you need for your triggerable objects.
A triggerable object can have one or more schedules associated as date/time triggers. Therefore, do not think you need to cram every possible date and/or time pattern into one schedule. As a basic example, you may have one schedule that specifies weekday date/time triggers, and a second schedule that specifies weekend date/time triggers. They can both be associated to a single triggerable object.
To schedule triggerable objects using Constraint Based Scheduling (CBS), click the Use Constraint Logic as a Trigger option.
When looking at future runs for objects configured using CBS, you will see a state of "Not Run (S)", where the S stands for Scheduled. The future run Execution Time is based on the Earliest Time property described below.
Constraints allow you to set pre-conditions that must be true for the Job/Plan to execute. See Constraints for more details. These constraints are always enforced unless an operator overrides the constraint requirement.
Constraint-Based Scheduling allows you to indicate that whenever, in a 24-hour period, a Job or plans constraints are satisfied (i.e. met), the Job/Plan is permitted to execute without an explicit trigger. This feature is designed to work only with triggerable objects that need to run once in a 24 hour day, which can be typical for many workflows. If your workflow needs to execute multiple times per day, then Constraint-based Scheduling is not an option. Additionally, this type of trigger assumes you have one or more General Constraints configured on the triggerable object's Constraints property sheet.
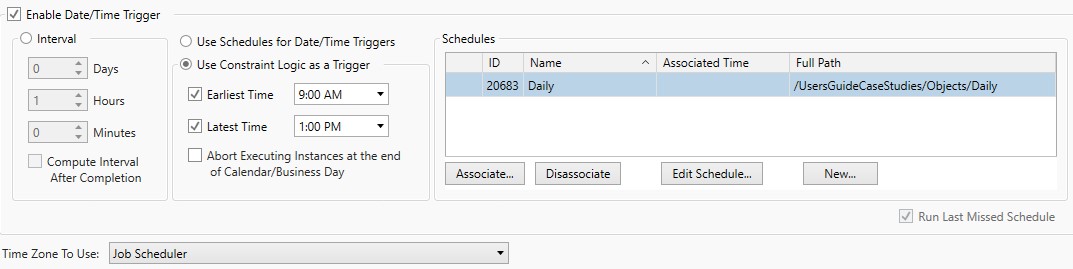
The above image depicts a Plan that is enabled for CBS. The Plan has a constraint configured (on the Constraints property sheet) where a previous Plan must execute successfully prior to the execution of this one. CBS imposes no restrictions or limitations on the constraints that may be used for CBS scheduling. It can be one or more of the (4) General constraint types - Job (Instance), Variable, Resource and File. Whatever pre-condition(s) you need to specify are configured on the Constraints property sheet.
By default, a calendar day beginning at Midnight (0000) and ending at 2359 is assumed. By default, a "business day" and "calendar day" have the same beginning and ending times (the calendar day is always 0000 to 2359). It is the business day that can vary. An ActiveBatch Administrator can establish a new start (and indirectly a new end) time by configuring the Business Day feature. A new start time means a different start of day time, instead of midnight. For example, assume a company begins their business day at 0600. This would mean a business day is defined as 0600-0559. Crossing midnight would therefore not change the business date. Please see Business Day for more information on Business Date semantics.
Triggerable objects marked as CBS enabled, become “armed” when a new and eligible day begins. By “eligible” we mean a day/date specified in any associated Schedule object. To clarify, a Schedule object must be associated to the triggerable object as it specifies CBS trigger dates.
The execution time is determined by the “Earliest” and “Latest” times properties. The Earliest Time is the first time the system will check all the constraints configured on the triggerable object, to see if they are met. If they are met, the triggerable object will start, barring any other conditions preventing dispatch - e.g. a Queue is offline or full, etc.). The Latest Time indicates the latest time that the triggerable object must run by before it is disarmed and no longer eligible to run. Typically a triggerable object would advance from the Earliest time to the Latest because the constraints have not been met (evaluated to true) yet.
The frequency at which CBS rechecks constraint logic is set on the Constraints property sheet. The property labeled Wait. Check every "x" Minutes, or Hours, etc. is what determines this. How long to check is determined by the CBS Latest Time property.
Earliest Time - The earliest time a CBS enabled object can be armed on a scheduled run date. If the constraints are met at the earliest time, then the triggerable object will begin executing at that time.
Earliest Time - Default value
The earliest time is the beginning of the calendar day, which is midnight.
If "Use Business Day Semantics" is checked on the Constraints property sheet, the earliest time is the beginning of the Business Day.
The Business Day is configurable by an ActiveBatch Admin.
Earliest Time - Override Default value
If a time is entered in this property and the box is checked, the default earliest time is overridden and replaced with the time entered here.
Latest Time - This is the latest ending time that a CBS enabled object is disarmed and/or can be executed through CBS.
Latest Time - Default value
The latest time is the end of the calendar day, which is 2359.
If "Use Business Day Semantics" is checked on the Constraints property sheet, the latest time is one minute before the end of the Business day.
The Business day is configurable by an ActiveBatch Admin.
Latest Time - Override Default value
If a time is entered in this property and the box is checked, the default latest time is overridden and replaced with the time entered here.
Using the above figure as an example, the earliest this triggerable object can run is 0900. The latest it can run is 1300 (1pm). The defaults were overridden by the user.
As CBS enabled objects adhere to a 24-hour cycle, it is possible that a late running instance can run past the end time of the day (calendar or business). The “Abort Executing Instances…” property determines what should be done if that happens. By default, the executing instance is allowed to continue to run. If you would rather the instance be aborted, then check the Abort Executing Instances... property.
Note: You must associate at least one (1) Schedule object for CBS to work, with the date(s) in the Schedule specified (no time specifications are used). If you don’t specify any Schedule(s) - the triggerable object will not run based on CBS. Also, if you do specify a Schedule that has time(s) configured, the times will be ignored as the Earliest Time / Latest Time properties are always used to determine the arming/execution of the CBS trigger.
Run Last Missed Schedule: This field indicates whether the last “missed” schedule time should be executed. For example, let’s say a triggerable object was scheduled to run at 17:00 (5pm) today, but the Job Scheduler machine was down. When the Job Scheduler machine is started at 18:00 (6pm) that scheduled execution time would have been missed. With this field enabled, the Job Scheduler will execute the Plan based on its last scheduled time.
Note: Only the “last” missed schedule is honored. This is true even if the Plan had missed five (5) scheduled times. In other words, the object is triggered once (not 5 times).
Time Zone to use: This field indicates the time zone to use for the triggerable object. Possible time zones are: Job Scheduler, Client (Submitter’s machine), UTC (Universal Time Coordinated or Greenwich Mean Time) or any time zone you select. The Time Zone is used for time trigger(s), CBS time constraints and the @TIME variable.
Event Triggers
ActiveBatch supports a wide variety of event triggers. An event trigger is different from a date/time trigger because ActiveBatch is monitoring for an external event to occur, and when it does, a trigger occurs. An external event is not controlled by ActiveBatch, the way date and time triggers are. Event triggers may occur in a predictable manner - or be completely random.
A File Trigger is one example of an event trigger. When this trigger is configured on a Job, ActiveBatch monitors a specified directory for changes (e.g. a new file has been added, modified or deleted), and when that happens, the Job triggers. Event triggers are useful because the event is typically an indicator that the Job is ready to run. Using the File Trigger example, the file that has been added to a monitored directory may be the file that the Job must process (the payload of the Job uses the file). Rather than scheduling a Job at a time you think the file may arrive, then use a file constraint to periodically check for the file arrival - you can use the arrival of the file as the trigger mechanism. This takes the guesswork out of setting up a schedule and configuring file constraints. You know the file is available because the File Event detected its arrival. The Job can be dispatched immediately upon the arrival of the file. No schedules or constraints are required.
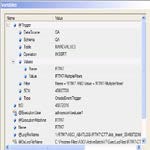
Event triggers can be added to all triggerable objects (Jobs/Plans/references). They are configured on the Triggers property sheet, as depicted in the image below. This image was taken from a Job property sheet, but it is the same for plans and references.
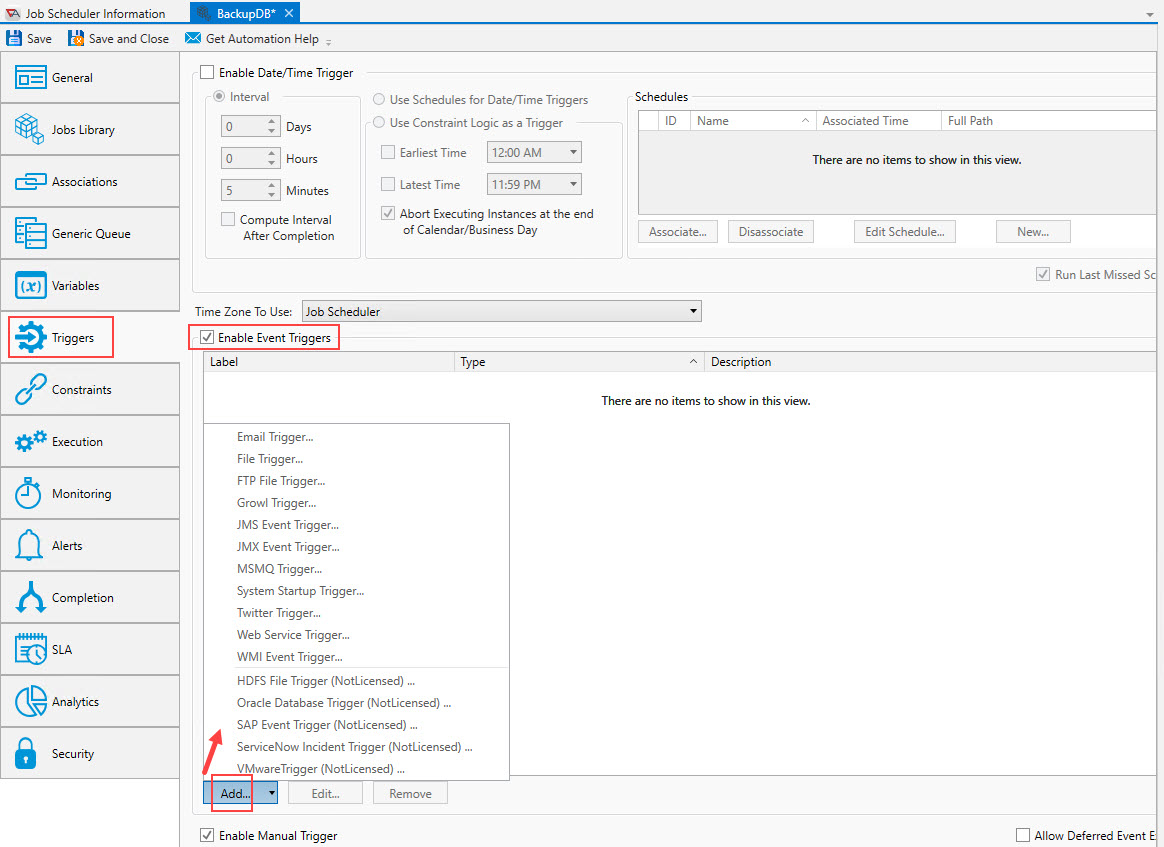
To configure any event type trigger, check the Enable Event Triggers checkbox. Next, there are two other checkboxes on the Trigger property sheet which are:
Enable Manual Trigger - By default, this checkbox is enabled. When checked, it means the object can be triggered manually using various methods that access the "Trigger" command, where the most common is using AbatConsole or WebConsole (e.g. a right-click > Trigger or Trigger > (Advanced) menu option). This property, despite where it is located, it is not related to Event triggers in any way.
Allow Deferred Event Execution - By default, when an event occurs during an “excluded” period (i.e. a period the object is not to execute) the triggering event is ignored. If the Allow Deferred property is checked, then the triggered instance will be dispatched as soon as the exclusionary period is over. Exclusionary periods are configured on the Constraints property sheet. See Date/Time Constraints This includes any exclusions specified in the Date/Time list, and exclusions specified using one or more associated Calendar objects. If an event trigger occurs during an exclusionary period when the Allow Deferred checkbox is enabled, an instance will be created, but it will go into a "Waiting Date/Time" state. The waiting instance's Execution Time will specify the time the instance will move into an executing state (again, after the exclusionary period is over). As an example, if the event trigger occurred during a Calendar holiday, then the Execution Time would be the start of the next business day.
If you anticipate multiple events occurring during an exclusionary period, and you would like all events to create a waiting instance, be sure to configure the triggerable objects Execution > If Active properties to allow the creation of multiple instances. If the default value of "Skip" is set, only one instance can be active at a time. Any instance that is not complete (success, failure or aborted) is considered active. As an example, if 10 file trigger events occur during an exclusionary period, and If Active is set to "Skip", only one instance for one file trigger will be created. The rest of the events would be ignored.
Note: The Allow Deferred property is not applicable to a manual Trigger operation.
To add a new event trigger, Click the Add button as depicted in the image above. Currently, sixteen (16) event trigger operations are supported. Five (5) additional event trigger operations are available via separate licensing and purchase: HDFS File Trigger, Oracle Database Trigger, SAP Event, ServiceNow and VMwareTrigger.
Common Event Trigger Properties
There are two properties that appear on almost all ActiveBatch Event Triggers (except WMI and System Startup events): Queue and User, as depicted in the image below (see the bottom 2 properties).
The Queue property represents an Execution Queue
The User property represents a User Account object whose security credentials will be used to initiate the ActiveBatch Event framework (other than the File Trigger event in which case the security credentials are used when performing the File Trigger event itself). The ActiveBatch Event Framework is a process that then initiates the various supported events. With the exception of File Trigger, all the other events use this two-stage process. By default, when the User Account is omitted, the ActiveBatch service account is used to initiate the ActiveBatch Event framework. With the exception as noted above, that’s fine because the actual event itself will still require security credentials to perfect the event trigger you want to enable. For File Trigger events, we recommend that you do specify a User Account object since those events, in particular, assume a “default” security context (in other words, they use the credentials of whatever initiated the Framework).
Next, there are a couple of other properties you can configure for each event you create.
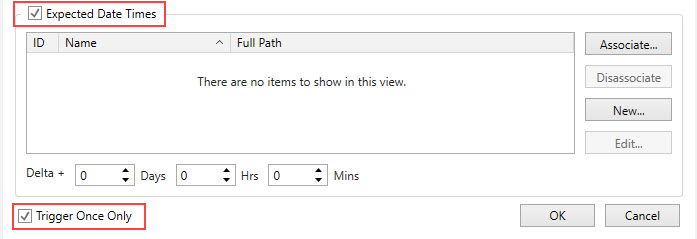
Trigger Once Only: If enabled, this event is triggered once (when the event occurs) and then is disabled for the life of the object.
Expected Date Times: This facility, when enabled, allows you to associate a date and time with an expected event, which is useful when the event occurrence is predictable.
In many cases, events are not predictable. This means views such as the Daily Activity view, the Runbook or Operations views - do not depict expected future runs since no date or time expectations are configured. It is very possible that the event trigger will occur randomly, on random dates and/or at random times. In that case, this Expected Date Time feature would not be useful.
Alternatively, if there are scenarios in which you can predict when an event will occur, you may find this feature useful. It allows you to associate one or more Schedule Objects that are configured with the dates and times you expect the event to occur. The triggerable objects may not run at exactly that time, therefore you are using this feature to set general expectations, which is especially helpful when:
Displaying various instances views that depict future runs (it provides a more accurate picture as to what is coming).
You would like to alert users if the event does not occur. The alert type is named: Job/Plan missed expected trigger. You must configure this alert if you would like to use it.
Note: When Schedule(s) are associated this way - on the Event property sheet, the Schedule object will not produce date and time triggers but rather, date and time expectations are set.
When looking at future runs for objects configured using Expected Date Time, you will see a state of "Not Run (E)", where the E stands for Expected trigger. The Execution Time field for the future run will be the expected trigger time, based on what was set in the Schedule object.
The Delta field allows further flexibility when setting up an expected time frame for your triggerable object. It expands the expected trigger time window, beyond the set time taken from the Schedule object. It also represents the amount of time that can go by before missed expected trigger alert (described above) goes out - if the expected event does not occur by the Scheduled time plus the Delta time. The alert is useful when a predictable event does not occur because there could be an underlying issue that needs to be investigated.
To use the facility, enable the Expected Date Times checkbox, as depicted in the image below. You can add one or more Schedule objects that include the date(s) and time(s) the event is expected to occur. Click the Associate button if you have an existing Schedule object to add. To disassociate a schedule, select the schedule in the list, then click the Disassociate button. To edit a schedule, select the schedule in the list, then click the Edit button. To add a new schedule, click the New button and configure the new schedule object accordingly.
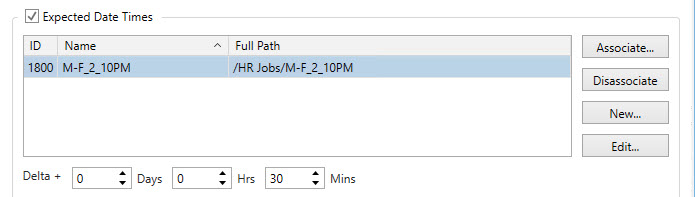
The settings above depict a Schedule object named M-F_2_10PM which produces a weekday time expectation of 2:10pm. Combined with the Delta property of (30) minutes, this effectively produces an expectation that this Plan or Job is expected to run each day between the hours of 2:10pm and 2:40pm (not including the duration of the Plan/Job itself). If the event does not occur by 2:40pm and the missed expected alert is configured, the alert will go out at that time.

The example above, using the Daily Activity view, depicts the same Job with an “expected” (E) future run-time of 2:10pm.
Now that the common Event trigger properties have been described, this topic will now describe each event trigger in detail. Expand the desired event trigger to learn more about it.
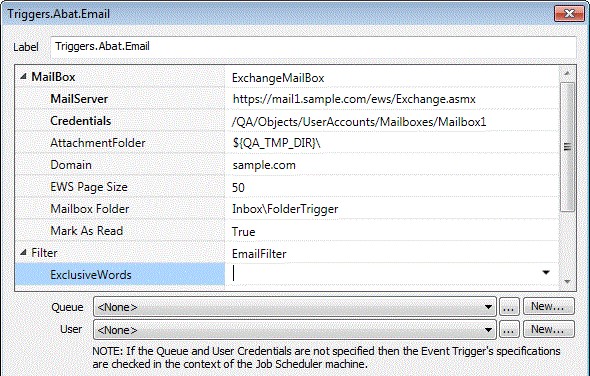
The E-Mail Trigger allows you to trigger a Plan or Job based on various criteria within a received E-Mail message.
Mailbox: ActiveBatch currently supports two (2) mailboxes for accessing e-mail as an event trigger: Microsoft Exchange (and Hosted Exchange) and POP3. Clicking on the dropdown shows the two possible choices. When selected the input parameters for your selection are displayed.
This section describes the properties needed for accessing the selected user’s mailbox using Microsoft Exchange.
MailServer: This property is the host name or FQDN of your Microsoft Exchange mail server OR the URL endpoint of your EWS server (for example, https://mymail.company.com/EWS/Exchange.asmx).
Credentials: This property is used to specify the actual user’s mailbox. Please select a User Account object representing the proper credentials by clicking on the dropdown.
Note: The User Account “username” property must employ UPN (User Principal Name) syntax (i.e. user@company.com) as this will be used to denote the target mailbox.
AttachmentFolder: This property is used to indicate that, if the received e-mail contains attachments, you would like the attachments created in the folder specified. If the e-mail does not have attachments nothing will be created. The filenames of the attachments are taken from the e-mail itself. If this property is omitted, then attachments are not externally saved.
Domain: This property is used when accessing a hosted Exchange server in which the domain needs to be specified along with the Username and Password credentials. If omitted, only the security credentials as specified in the User Account object will be used.
EWS Page Size: This optional property indicates the number of mailbox messages that will be processed at any one time. By default, that value is 50. Specify a higher value if the mailbox will be receiving more than that value at any one time.
Mailbox Folder: This optional property allows you to specify a mailbox folder or sub-folder. By default, the folder “InBox” is used. If specified the syntax is “ParentFolder\sub-folder” where “ParentFolder” is a Microsoft Well-Known folder name. (EWS Only).
Mark As Read: This optional Boolean property indicates whether you want the messages in the mailbox to be considered to have been read when the trigger is processed. This is very useful when the mailbox is only used for automated processing. By default, mailbox messages are not considered to have been read.
This section describes the properties that may be optionally specified if you need to filter for specific criteria that the mail message is to have for the trigger to be performed.
ExclusiveWords: If specified, one or more words (or phrases), separated by a comma, whose absence in the incoming E-Mail message body is necessary in order to act as a trigger.
From: If specified, indicates the “From” field that must match the incoming E-Mail (multiple addresses can be specified separated by a comma).
HasAttachment: If specified this optional Boolean parameter, allows you to ignore whether an e-mail has an attachment or not. If True is specified, the E-Mail must contain an attachment to be considered. If False the email must not contain an attachment. If omitted, no attachment requirement is imposed.
InclusiveWords: If specified, one or more words (or phrases), separated by a comma, whose presence must be contained in the incoming E-Mail message body in order to act as a trigger.
Subject: If specified, one or more words (or phrases), separated by a comma, whose presence must be contained in the “Subject” field in order to act as a trigger.
To: If specified, indicates the “To” field that must match the incoming E-Mail (multiple addresses can be specified separated by a comma).
This section describes the properties needed for accessing the selected user’s mailbox using POP3.
MailServer: This property indicates the machine name for your POP3 Mail server. Typically this would be a fully qualified domain name.
Credentials: This property is used to specify the Windows credentials to be used when accessing the mailbox. Please select a User Account object representing the proper credentials by clicking on the dropdown.
Port: This property contains the POP3 port number. By default, 110 is used.
UseSSL: This Boolean property indicates whether SSL (Secure) POP3 should be used. The default is False. Please note that if you set this property to true you will probably also need to change the port number.
ExclusiveWords, InclusiveWords and Subject also support wildcards (asterisk for multi-character wildcard and question mark for single character wildcard). As multiple entries are comma separated, a phrase containing an embedded space is valid and does not require a quoted string. All matches are performed in a case-less manner.

The above figure displays the @Trigger structure variables that are passed back from a successful e-mail event. When multiple files are attached, the “AttachmentFile” variable is a comma separated list of files stored within “AttachmentPath”. In a later release of ActiveBatch, an additional variable was been added to the above structure named .RawBody. Where “.Body removes all HTML and formatting characters (i.e. newlines), .RawBody does not. All HTML and/or formatting characters are left intact.
The System Startup event will trigger a Job/Plan when the Job Scheduler service is started or restarted. When you select this event, the onStartup value will be set to True. Keep this value, then click OK to save. This is all you need to do when using this event trigger.

The File Trigger event provides you with the ability to specify a folder, recursive set of folders and/or specific file(s) (using wildcards) in which one or more files are subject to a file operation occurring. When that operation occurs, the event is produced and the Job/Plan is triggered for execution.
Supported file operations through the Filter are: Created, Changed, Deleted and Appeared (renamed). By default, the creation operation is enabled. File Event is therefore especially helpful when you want to trigger a Job/Plan based on the creation of a file. Appeared is useful when a new file may be created in another directory and then later moved to the target directory. Windows IIS server uses this technique when downloading a file.
Note: If using the Delete file operation, please note that some Windows facilities (i.e. DOS/CMD) use the short-form filename for these operations. This means you must also use the short form name for the proper pattern matching.
You can specify a specific file or a directory specification. For example, if you want to trigger a Job/Plan based upon the reception of a file through FTP, the trigger will occur only after FTP has populated the file (see note below).
Note: An Exclusive access check is implicitly performed on the target file(s) to determine if the file trigger event may be declared. If this check fails, ActiveBatch will poll the file(s) starting with a one (1) second delay and build to a sixty (60) second delay the longer it takes for the Exclusive access check to be successful.
The “changed” operation is subject to certain limitations imposed by Windows and other platforms. In particular file size and date processing may not be timely due to caching considerations (see note below)
Note: If using the “changed” filter, understand that multiple unintended trigger operations can occur (even with ActiveBatch attempting to suppress). In addition, each operating system handles caching of directories differently so updates may not be timely or even match with file changes you know are occurring. For this reason we caution your use of this filter as it can be problematic unless you’ve experimented with your actual intended use.
Recursive refers to whether the specified directory should also include any nested sub-directories. If enabled, sub-directories are included. When monitoring directories, please note that the ending backslash is required as in the above example. You can also use wildcards such as C:\test\*.*.
For monitoring files on non-Windows systems you must specify Queue and User properties. The Queue represents the machine in whose context the “File Trigger” specification will be interpreted (for example, C:\test\ would be a local C drive on that Execution Queue/machine). The User property indicates the security credentials that will be used for file monitoring.
For monitoring files on Windows system you may specify Queue and User properties. If you omit these properties the file monitoring will be performed on the Job Scheduler machine and use the Scheduler’s service credentials. If you specify the Queue property the file monitoring will be performed on that Execution Queue/machine. If you specify the User property the file monitoring will be performed using the specified security credentials.
Note: By default, all file specifications are evaluated from the Job Scheduler machine’s point-of-view. This is the case when the “Queue” property is left blank. If the Queue property is completed, the file specification will be evaluated from the target Execution machine’s point-of-view.
Note: You may use ActiveBatch variables for the “File Trigger” property, however, they are only evaluated once when the triggered is declared (typically on Job Scheduler startup).
Note: File Triggers performed on Windows use the Directory Change Notification (DCN) facility. This facility does have limitations in terms of the number of outstanding directories that may be watched as well as the number of outstanding file triggers at any one time that may be executed. For more information, please read the Knowledge Base articles “File Trigger Session Limitations” and “File Triggers and simultaneous events”. The “File Trigger Session Limitations” article in particular also references the Microsoft article that speaks to various quotas that may need to be increased. This is especially true if you intend to watch or access over 100 file trigger events. As of V8 a change has been made to improve reliability in the event of a DCN failure. In the event of a DCN failure (for example, a network share was specified and the host sharing that directory lost connection), on resumption of DCN, a check is made to determine “created/appeared” and “deleted” changes. Those file trigger events will then be initiated. Please note that if a file is created and deleted before the DCN can be resumed, ActiveBatch will not be aware of the directory changes. Users must ensure that directories to be watched do not contain thousands of files for optimum performance.
Note: File Triggers performed on a non-Windows system use a built-in polling mechanism to determine directory changes. By default the poll is thirty (30) seconds. Users must ensure that directories to be watched do not contain thousands of files for optimum performance.
Note: If you prefix a File Trigger specification with “poll:” (case-insensitive) that will cause Polling logic to be used instead of DCN on Windows systems. “poll:” has no effect on non-Windows systems since that is the only mechanism available.
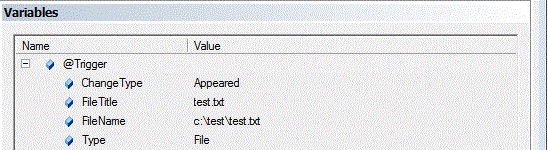
In the above example, the @Trigger variable structure contains several useful variables to help identify the specific file that caused the event. Note that .FileName contains the complete file specification where .FileTitle contains just the filename and extension portion. This can be useful if you need to move the file to another location.
File Triggers also support the use of Regular Expressions in a manner similar to that of the Success Code Rule Search String. Prefixing a File Trigger specification with “regex:” will cause the File Trigger specification to be viewed in the context of a Regular expression. For example, regex:c:\test\regpoll[0-9].bat allows for any file containing regpoll0.bat through regpoll9.bat to be included. If you need to also include the poll: prefix, regexpoll: should be specified. File Trigger Regular Expression support is available for Microsoft Windows, UNIX systems and OpenVMS. Please note that some minor differences in the handling of Regular Expressions may be present between OSes due to differences in the underlying RegEx engines used.
FTP File Trigger events provides you with the ability to specify a folder, recursive set of folders and/or specific file(s) (using wildcards), on a specific FTP server, to determine when a file is subject to a file operation occurring. When that operation occurs, the event is produced. For example, if a file is created on an FTP server within \etc\test, an event is produced and the Plan or Job is triggered. File operations include Created, Deleted, and Modified.
By creating an FTP File Trigger event you can avoid the workload of polling an FTP server and instead create a workflow when a file(s) is created, modified or deleted on an FTP server.
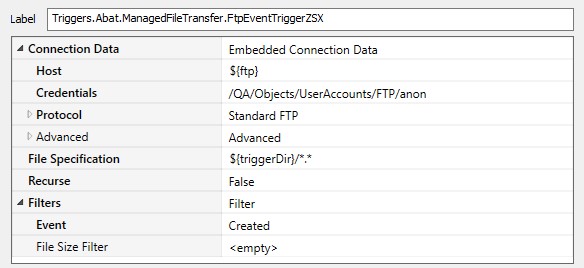
The FTP File Trigger event consists of three (3) sections. The first is the Connection Data. You can either specify the server and security credentials within the trigger (known as “embedded”) or by reference to a special User Account (known as “managed”). Part of the Connection Data is what type of FTP protocol you’ll be using: Standard FTP (which includes FTP as well as FTPS (SSL FTP) or Secure Shell FTP (SFTP). The second part is the File Specification and Recursion. This area indicates the type of file specification (folder or folder/file) and any wildcards used. Recursion indicates whether sub-directories are to be examined. The last part is the Filters specification. This include whether the event is to be generated when a file is created, modified or deleted. In addition, you can specify a size parameter as well as a comparison operator to be applied to the desired file size.
Note: This event does perform polling using a global value that is part of the event extension. The default is five (5) minutes but can be changed by the ActiveBatch Administrator.
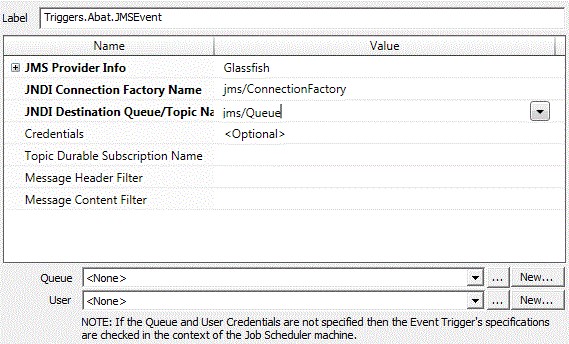
The JMS Event Trigger allows you to trigger a Plan or Job based on receiving a JMS message from a selected Queue. The message (both body and properties) can be subject to additional filter criteria that must be met before the trigger action can be performed. JRE V1.8 or later is required to be installed on the Job Scheduler machine for this event to be operational.
JMS Provider Info: This collection of properties represents the JMS server and software you are attempting to connect to. The dropdown lists of the JMS servers that has been tested. A custom setting is available for you to add a new JMS configuration.
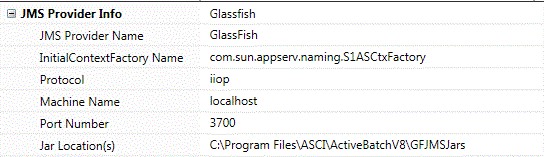
JMS Provider Name: This is the name of the JMS server software.
InitialContextFactoryName: This is the name of the Initial Context Factory class for the JMS server’s JNDI implementation.
Protocol: This is the protocol that will be used to connect to the JMS server.
Machine Name: This is the machine where the JMS server software resides. For TIBCO only, failover is supported by specifying a comma separated list of machine names where a machine name is a legal hostname and optional colon port-number (i.e. server1:3717).
Port Number: This is the TCP/IP port number that will be used for communication.
Jar Location(s): This the location of the required Jar files necessary to communicate with the JMS server.
JNDI Connection Factory Name: This property represents the JNDI name of a Connection Factory object. A ConnectionFactory object encapsulates a set of connection configuration parameters that has been defined by an administrator.
JNDI Destination Queue Name: This property represents concerns the destination queue name for the possible JMS message to be received. This destination object can be a queue or a topic.
Credentials: This property, if specified, provides authentication for the JMS receive. The property represents a User Account object with a username and password that is appropriate for JMS authentication with your JMS provider.
Topic Durable Subscription Name: This property, if specified, indicates the durable subscription name for this topic.
Message Header Filter: This property indicates filter criteria for the message properties that must match for the message to be considered event-able.
Message Content Filter: This property indicates filter criteria for the message content that must match for the message to be considered event-able.
The JMX Event Trigger allows you to trigger a Plan or Job based on the specification of a JMX attribute. You can further indicate the value of the attribute that must be met before the trigger action can be performed. JRE V1.8 or later is required to be installed on the Job Scheduler machine for this event to be operational.
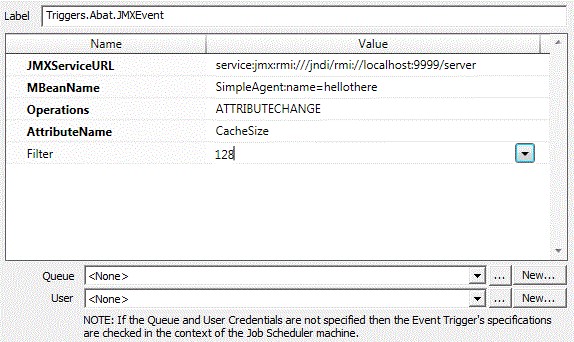
JMXServiceURL: This property contains the URL of your JMX server. The format is similar to:
“service:jmxrmi:///jndi/rmi://server-name:port-number/page where “server-name” is the host name of the JMX server, port-number is the port number being used by that JMX server and page is the directory being used for JMX connections.
MBeanName: This dropdown lists the mbean names that are housed on the JMX server.
Operations: This selection sheet helper allows you to select those operations you’re interested in monitoring. Currently only Attribute Change is supported.
AttributeName: This dropdown lists the attribute names for the mbean you’ve selected.
Filter: This property, if specified, indicates the value the attribute must be to allow the event to occur.
The MSMQ Trigger allows you to trigger a Plan or Job based on the reception of a message to a selected MSMQ queue.
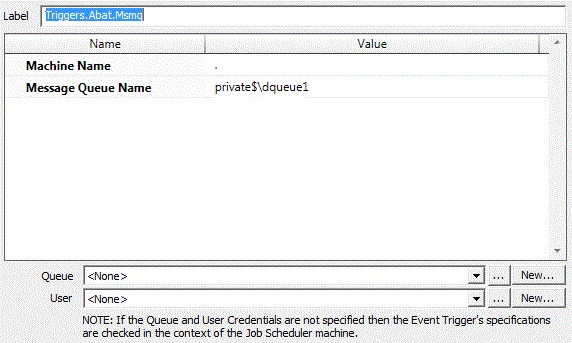
MachineName: This property indicates the name of the machine that is hosting the MSMQ system.
MessageQueueName: This property indicates the name of the Queue that you want ActiveBatch to use for triggering operations.
The Twitter Trigger allows you to trigger a Plan or Job based on a message received by a specified Twitter account using Twitter Authentication. You can further indicate filter criteria for the message itself and whether a trigger action should take place.
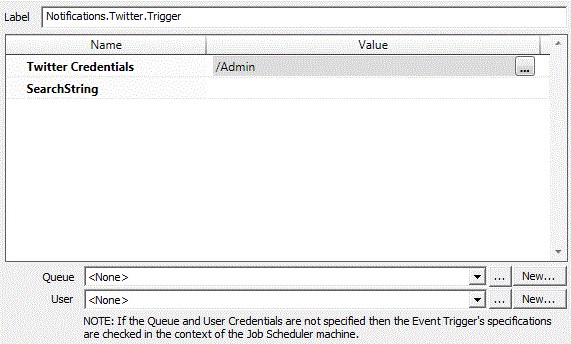
Twitter Credentials: This property is a User Account object with Twitter Authentication enabled. The object must allow proper access to Twitter through a security token.
SearchString: This optional property represents search criteria for the event. When a tweet is received, the search string is compared to determine if the message meets the eligibility criteria. If so, the event triggers the objects. If omitted, any received message will satisfy the event requirements.
The Web Service Trigger allows you to trigger a Plan or Job based on an event generated by a Web Service. Since a Web Service needs an “endpoint” or destination to send its web service message to, this facility creates those endpoints for you. The basic dialog deals with naming the endpoint (and making sure it’s unique), setting its security requirements and specifying an optional filter. Every web service endpoint also provides a Trigger method to allow an ActiveBatch aware web service the ability to trigger objects.

Identity: This property is used to create a unique endpoint. The created endpoint must be unique Job Scheduler wide (since the Job Scheduler is the publisher of all endpoints system wide). Please note that once you create a reference to the endpoint you should never change this value. Doing so, would cause you to also have to change all references to both the Endpoint and WsdlLocation.
EndpointType: This property is used to denote the type of endpoint that will be used. Four (4) options are supported: Basic, Secure, SecureCertificate and SecureUsername. Basic refers to a completely clear text, no security authentication required endpoint (think http://). The other three “Secure” options all support https: level communications. Secure indicates that no authentication credentials are required, SecureCertificate indicates that a valid client certificate is required to communicate with this endpoint. SecureUserName indicates that a username and password are required to communicate with this endpoint.
PublishMetadata: This property indicates whether the Job Scheduler will publish the endpoint as a Hosted Web Services. You can check which web service endpoints are published by copying the “Endpoint” property to a web browser. You will then receive a list of all published web service endpoints. A “true” property indicates the endpoint should be published. “False” indicates it shouldn’t be published.
IsGeneric: This Boolean property indicates whether the incoming message must adhere to the message standards imposed by the Wsdl schema or whether the message can be free formatted. A value of “true” indicates that a free formatted message is allowed and a value of false indicates that adherence to the Wsdl is required. This property does affect the setting of the @Trigger variable. A value of “true” will cause the XML Body and Headers to be returned. A value of “false” will result in only the user-specified variables, if any, returned. Note: The sending web service will receive an error if this setting is not adhered to.
XPathRule: This optional property indicates that an XPathRule filter will be applied to the message. If the filter expression is true, the message will be allowed to trigger the object. If omitted, any valid message will trigger the object.
Endpoint: (Read Only) For convenience the actual endpoint URL is displayed. This URL can be copied into a browser to examine and test the endpoint.
WsdlLocation: (Read Only) For convenience the base Wsdl specification is displayed.
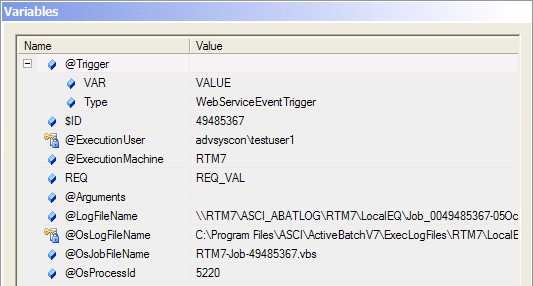
The above figure displays the @Trigger structure variables that are passed back from a successful Web Service event. The variable VAR value is set by the caller of the Web Service and available to the underlying triggered object.
ActiveBatch supports the integrated use of Microsoft Windows Management Instrumentation or WMI. WMI is Microsoft’s implementation of Web Based Enterprise Management (WBEM). ActiveBatch is both an Event Provider and Event Consumer. This means that ActiveBatch can register for any interested events and is notified by WMI when they occur. This section discusses the consumer aspects of ActiveBatch.
Note: WMI must be active on the Job Scheduler machine for you to issue WMI Event triggers.
ActiveBatch allows Job authors to indicate the events that a Job or Plan may be interested in and can trigger execution of the object when the event occurs. After completing the requested information, click OK to confirm and apply or click Cancel to cancel any addition or changes to the list of event(s).
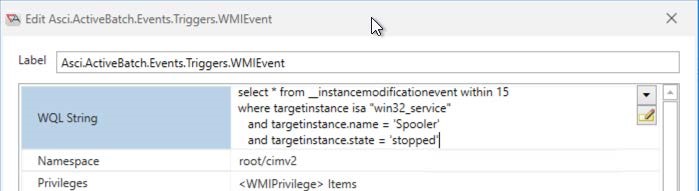
The dialog box requests that a WMI query be entered. For maximum flexibility, ActiveBatch supports the use of WQL (WMI Query Language, similar in syntax to SQL).
WMI Event. Enter WQL string below: This mandatory field takes a valid WQL statement describing the event you’re interested in. All WQL statements begin with SELECT. You are not restricted in what you can enter however, you should not specify polling intervals that would adversely impact ActiveBatch and/or system performance. The example above shows a WQL query requesting an event be triggered if the “Telnet” service enters a “stopped” state.
Namespace: You must indicate the namespace to connect to. The Namespace specification is:
\\machine\namespace, for example, ROOT\CIMV2 is the namespace for the local machine. In the above example, ${VM} represents a machine. Note: This variable will be evaluated only once when the trigger is armed.
Privileges: This field allows you to add or remove any specific privilege that the selected WMI provider will use to execute your query. Clicking the Add button causes two (2) properties to be shown:
Privilege and Enabled. Privilege is a dropdown list of all the possible privileges and Enabled is a Boolean property that indicates whether the specified privilege should be enabled or not.
User Information: This section allows you to select a User Account to associate with this event. The drop down button allows you to select specifying either a User Account object or an embedded Username/Password. It is highly recommended using a User Account Object instead of embedding the Username/Password within the Job itself. For a local machine (Job Scheduler machine) the ActiveBatch Event Framework authentication credentials are used and WMI does not support the specification of different authentication credentials for a “local” machine. For non-Job Scheduler machines you must specify authentication credentials that will be used for WMI Event processing. As with other portions of ActiveBatch, you can indicate that the username and password are to be saved.
User Account: This property causes a dropdown list of all User Account objects that you can specify. You would select one.
Username/Password: This pair of properties represents the embedded username and password.
Authority: (Optional) Server Principal Name.
Authentication Level: (Optional) Authentication Level
Impersonation Level: (Optional) Impersonation Level
Run Job on Event Machine (Generic Queue Only): You can indicate to ActiveBatch that the Job Queue to select is the machine that actually generated the event. For this feature to work properly the Job must be queued to a Generic Queue that contains at least one Execution Queue for the possible event machine. If no valid Execution Queue can be found that matches the event machine the Job will not be run.
This event trigger is only available via a separately purchased license. The HDFS File Trigger allows you to generate events based on changed to an HDFS folder (and the file(s) within that folder).
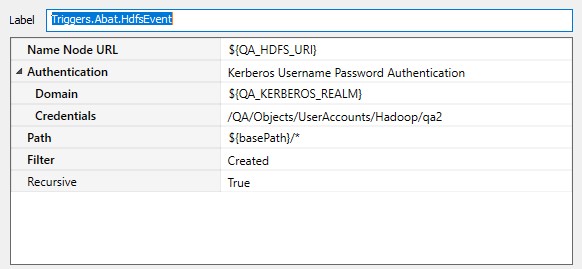
Name Node URL – The URL of the HDFS Name Node.
Authentication – This set of properties is used when executing on the HDFS Name Node. These credentials will be used to authenticate with Kerberos if necessary.
Path – Folder and file specification (including wildcards)
Filter – One or more operations concerning the file; Created, Appeared, Modified and Deleted.
Recursive – This Boolean property determines whether any sub-folders that are present in the path and examined in a recursive fashion.
This event trigger is only available via a separately purchased license. The Oracle DB Event Trigger allows you to obtain database events on a specified Oracle table. The events available are currently: Insert, Update and Delete modifications to a table.
This facility uses the Table’s transaction log file to seamlessly determine committed changes. While no changes are made to your database by ActiveBatch this facility (and the underlying LogMiner usage) does require that minimal supplemental logging be enabled. Please read the section on “Oracle DB Event Trigger” in the “ActiveBatch Installation and Administrator’s manual” for additional information.
Please note that as this facility exposes data within the specified table, ActiveBatch requires that the user requesting this event have a role of “DBA Access”.
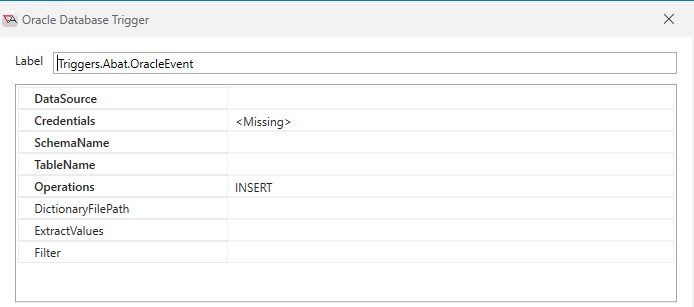
DataSource – This property references the target data source that the Schema and Table name are located on. This property also supports ActiveBatch variables.
Credentials – The object path of a User Account object. Clicking on the “Helper” will cause a tree display of all
ActiveBatch containers. You may then select a User Account object. The User Account credentials must have proper access to the target data source. Typically, the credentials will be a valid database username and password for this data source (unless Windows authentication is used in which the username/password will be a valid Windows account). This property also supports ActiveBatch variables.
SchemaName – The name of the schema which when used with the TableName identifies the desired table. This property also supports ActiveBatch variables.
TableName – The name of the desired table. This property also supports ActiveBatch variables.
Operations – This property indicates the operation(s) (and optionally “filter”) that you want ActiveBatch to declare an event. Valid operations are Insert, Update and Delete and may be specified by clicking on the property’s dropdown and checking those operations you are interested in.
DictionaryFilePath – This allows LogMiner to start in the context of a pluggable database (PDB) from the CDB level. To create the dictionary file (assuming UTL_FILE_DIR is set):
Login to the PDB where the trigger will be armed.
Create a new DIRECTORY or locate an existing one where the dictionary file will be stored on the file system (on the Oracle database server).
Generate the dictionary file via EXEC DBMS_LOGMNR_D.BUILD('<NAME>', '<DIRECTORY>', DBMS_LOGMNR_D.STORE_IN_FLAT_FILE)
This is the path that will be used in the Event Trigger.
LogMiner is used because this option prevents the system from modifying or locking your tables, and it reduces performance and file I/O impact. LogMiner is started from the CDB using the dictionary file. You will still need the appropriate privileges to arm the Event Trigger. In the event the trigger fails to arm, an access occur will occur.
These changes were specific to 12c+; however, because the DictionaryFilePath property is displayed for 11g as well, it is an optional field for Oracle 11g instances and CDB data sources. The field is required for any PDB data source.
ExtractValues – Depending on the operation you can extract field (columns) values from the change record and have them returned within the @Trigger.Values built-in ActiveBatch variable for later usage by the triggered object. For example, if the field ‘Value’ was specified the following variable specification could be used to access the data: @Trigger.Values.Value. The syntax for this property is to specify one or more separated fields.
Filter – The filter property allows you to refine your declaration of the event. With no filter specified, when the specified operation occurs an event is declared. When a filter expression is specified, the expression must evaluate to true for the operation to be declared an event. This allows very precise refinement of the database change that must take effect for the event to be declared. In the above example, VALUE=’${VALUE}’ this expression tests the table field VALUE against an ActiveBatch variable ${VALUE}. If the expression is true then an event would be declared. The expression syntax supported is the same as for constraints (meaning you can use Boolean operators, parenthesis, and arithmetic operations where applicable).
The above figure displays the @Trigger structure variables that are passed back from a successful Oracle Database event. Note the “Values” sub-structure. These variables are the column (field) and value that created the event. The “Operation” variable indicates that the event was caused by a table insert operation.
Note: On an Update operation the only variable values returned are those which have changed and also been specified in the “Extract” parameter. On a Delete operation, no variable values are returned for the fields within the deleted record/row.
This event trigger is only available with the SAP Netweaver license (which is separately licensed). The SAP Event Trigger allows you to trigger an ActiveBatch object (Job/Plan) based on any number of supported SAP events.
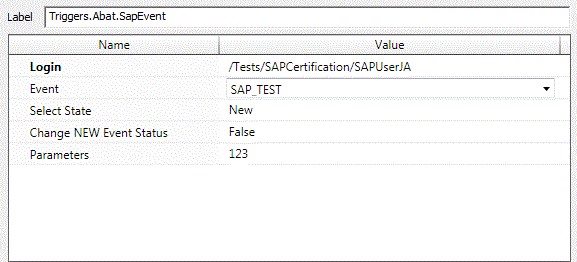
Login – This property is a User Account object that provides security credentialed access to an SAP system.
Event – This dropdown lists all the supported SAP events.
Select State – This dropdown lists the event state that is to be considered for the event trigger. Choices are: All – all events since the last time; New – new events since the last time and Confirmed – confirmed events since the last time.
Change NEW Event Status – A Boolean property that if true will change any event state to “Confirmed”.
Parameters – This optional property allows you to pass parameters to the triggered object (Job/Plan) when the event is triggered.
The ServiceNow Incident Trigger allows you to obtain events that occur on a specified ServiceNow instance. This event trigger is only available via a separately purchased license.

Connection Information: This set of properties describes the ServiceNow instance, security credentials and any proxy that must be used, to connect to the ServiceNow instance.
The properties list are those within the ServiceNow Incident. You may select specific values by using the helper dropdown. When an event matches those specified, a trigger is generated and executes the associated Plan or Job.
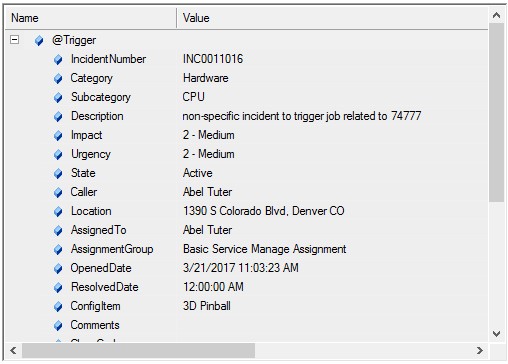
The above figure displays the @Trigger structure variables that are passed back from a successful ServiceNow trigger.
This event trigger is only available with the VMware license (which is separately licensed). The VMware Event Trigger allows you to obtain events that occur on a specified VMware Host system (and pertain to either the Host and/or Guest Operating System).
The initial portion of the event definition pertains to the selected VMware Host or vCenter system and security credentials for accessing that system. The optional portion consists of selecting the enumerated event and then selecting the event source. The event source can be either a: Virtual Machine, Host or Datacenter. In the example below, we’re interested in declaring an ActiveBatch event when a VmPoweredOffEvent occurs on the Virtual Machine QAVM. When the event occurs the associated Job or Plan will be instantiated and the details of the event are available through the standard @Trigger built-in variable.
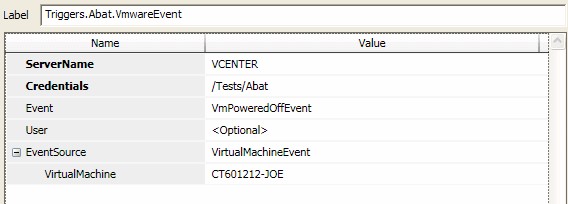
ServerName – Host Name or IP-address of the VMware Host or vCenter system. This property also supports ActiveBatch variables.
Credentials – The object path of a User Account object. Clicking on the “Helper” will cause a tree display of all ActiveBatch containers. You may then select a User Account object. The User Account credentials must have proper access to the VMware Host. Typically, the credentials will be a valid Windows username and password for this system. This property also supports ActiveBatch variables.
Event – This property, accessible through the dropdown, enumerates all the possible VMware events you might be interested in. If none is specified, then all possible events are eligible. The event list is dynamically accessed from the specified ServerName.
User – The object path of a User Account object. Clicking on the “Helper” will cause a tree display of all ActiveBatch containers. You may then select a User Account object. The User Account credentials must have proper access to the VMware Host. Typically, the credentials will be a valid Windows username and password for this system. This property also supports ActiveBatch variables. If omitted, the Credentials specified are used.
EventSource – This property allows you to select the source of the event. VMware currently supports three (3) types of events: VirtualMachineEvent, HostEvent and DatacenterEvent. Depending on your selection an additional property is displayed requesting the name of the underlying machine (either virtual machine, host or data center).
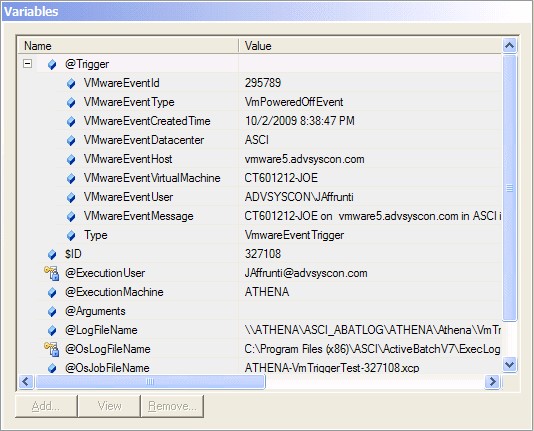
Depending on the event captured, ActiveBatch will pass information through the built-in @Trigger structure variable.
These values can be retrieved through ActiveBatch string substitution for use within the triggered ActiveBatch Job or Plan.
A constraint (or dependency as it is often called) is a specification or condition that must be true before a triggerable object (Job, Plan or Reference) is allowed to execute. An object triggered to run will not do so unless all the constraints (you can set more than one) have been met.
Constraints are configured on a Job or Plan's Constraints property sheet. The constraint properties are the same for both jobs and plans, with the only difference being there are two additional properties on the Job's Constraints property sheet (Dispatch Alert Delay and Maximum Dispatch) that are not present on the Plan's Constraint property sheet.
Constraints are not triggers. However, there is a type of trigger that uses the general constraints discussed here. This type of trigger is named Constraint Based Scheduling (CBS), which is configured on a Job or Plan's Triggers property sheet. While CBS is a trigger type, it should not be confused with the constraints described here, which are not triggers. They are conditions that must be met before an already triggered object can run.
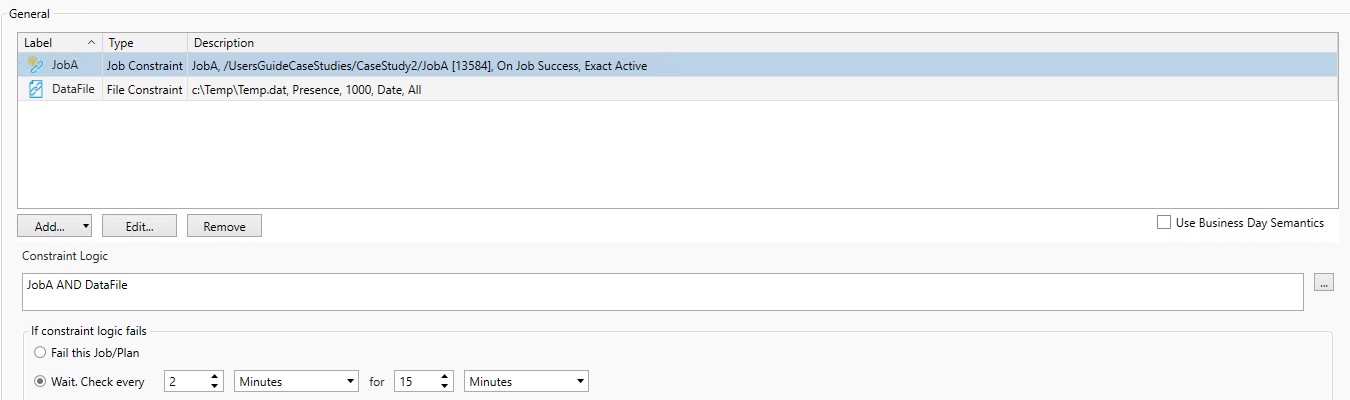
ActiveBatch supports (4) General constraints: File, Job, Variable, and Resource. Additionally, it supports (2) Date/Time constraints: Date/Time exclusion list and Calendar object associations. Below is an image depicting a list of general constraints and action buttons that allow you to add, edit and remove general constraints. Additionally, the general constraints section includes: the Constraint Logic property, properties associated with a constraint failure, and a checkbox enabling the Business Day Semantics property.
When you click on the Add button, you will be prompted to select one of the 4 types of general constraints. Depending on which one you choose, the appropriate dialog window will open, providing you with additional property settings described in this section (each of the 4 general constraints are described in detail below). Please note you can add multiple constraints for any give Job or Plan, which can include a mix of the 4 general types, all of the same type, etc. In the image below, a Job and File constraint have been configured.
Let's look at the properties that are not specific to any particular general constraint type.
Use Business Day Semantics: This Boolean property indicates that this object (Job or Plan) is to use a Business Day instead of a normal calendar day. By default, a calendar day beginning at 0000 and ending at 2359 defines a day period. If Business Day Semantics is enabled, then an ActiveBatch Administrator established a business day, which is a 24 hour period with a start time something other than 0000. Please see your ActiveBatch Administrator for the Business Day definition that governs your system. It should be noted, however, that a Business Day, even though it spans past midnight, is still considered 1 day. For example, January 1, 0600 (the Business Day start) and January 2, 0559 (the Business Day end) are all considered January 1 in terms of a business day.
Constraint Logic: This section indicates how the various listed general constraints should be checked and in what order (the evaluation is done from left to right). When you save new constraints, the constraint label is automatically added to the Constraint Logic property. However, additional information may be required in the constraint logic property (for example, a comparison operator and value when using certain types of variable constraints). You can specify comparison, Boolean operators and parenthesis to ensure that any constraints match your expectations. Boolean logic operators, in English or VBScript-style, or arithmetic operators may be used (all arithmetic operations are integer based). For example, “and” or && may be specified. A unique label identifies each constraint. In the above example, “JOBA” and “DataFile” constraints must both be met. See Constraint Logic Operators for a complete list of operators. Please note that you should exercise caution when performing logical operations on strings. Other than “0”, “1”, “False” and “True” the behavior when using logical operations on strings is undefined.
Note: When a constraint is removed from the "General" constraints list using the Remove button, you must always ensure that you also remove the associated label referencing that constraint (and its additional associated logic, if any) from the Constraint Logic property. Missing constraints whose labels remain in the Constraint Logic property are treated as false.
Note: A constraint in the "General" constraints list will be ignored if its label is not present in the Constraint Logic property.
If constraint logic fails: There are a few fields that control what actions should be taken if one or more constraints fail. In the above image, “JOBA” must complete successfully and the file c:\Temp\Temp.dat must be present, be at least 1000 bytes in size and created within the last five (5) hours - for this constraint to be satisfied. If you look at the bottom of the figure you’ll see an “If constraint logic fails” specification which indicates that the system should wait up to 15 minutes to determine whether the constraint failure has resolved itself.
Fail this Job/Plan: When checked, ActiveBatch fails the Job immediately if the constraint is not met after the trigger occurs. It will fail with a Failed Constraint state, where State is a column present in various instances views.
Wait: This indicates that the system should wait (the default behavior), and not fail the Job immediately. How long to wait is determined by the next set of paired controls. Wait. Check every <number> / <units> for <number> / units interval. Units is one of the following: Hours, Minutes or Seconds (the legal range of the number depends on the unit specified). Interval is one of the following: Days, Hours, Minutes, Seconds, Times or Forever. The default recheck interval is “Check every 2 minutes for 10 minutes”. This is the how long the system will check to see if the constraint is satisfied, and the check frequency. A instance whose constraint is not initially met will go into a Waiting Constraint state. If the constraint is not met within the specified time frame, the instance will fail with a Failed Constraint state, where State is a column present in various instances views.
Note: Job Scheduler performance can be negatively impacted by frequent constraint logic checks, especially if multiple jobs are waiting on constraints at the same time. Every failed constraint check causes a round of instance preprocessing logic to run. This includes the Job Scheduler communicating with the ActiveBatch back-end database. For example, configuring a constraint check with a frequency of every couple of seconds and a duration of hours and days would not be recommended. This is especially true if there are many other jobs waiting on constraints at the same time, also configured for frequent constraint checks. It is recommended you find the right balance when establishing constraint logic. Use the largest check interval with the shortest duration that is practical for your workflow.
Operator Description +
Addition
-
Subtraction
*
Multiplication
/
Division
%
Modulo
^
Raise to power
&&
Logical AND
AND
Logical AND
||
Logical OR
OR
Logical OR
!=
Not Equal
<>
Not Equal
NOT, !
NOT or Complement
==
Logical Equal
=
Equal
>=
Greater than or equal
>
Greater than
<=
Less than or equal
<
Less than
Note: You can force an instance to run that is waiting on constraint(s) using the "force run" operation. You can also manually trigger an object and ignore constraints by checking the appropriate "ignore" options in the Trigger (Advanced) operation.
An Instance constraint is one where a previous Plan/Job must have executed to completion before this instance can be allowed to execute. The author of the constraint can further indicate whether the instance must have completed successfully, failed or simply completed (where success or failure is not considered).
To ad an Instance constraint, click the Add button, then select Job Constraint (it is named Job Constraint but Plans can be used as well). The following Job Constraint dialog appears:
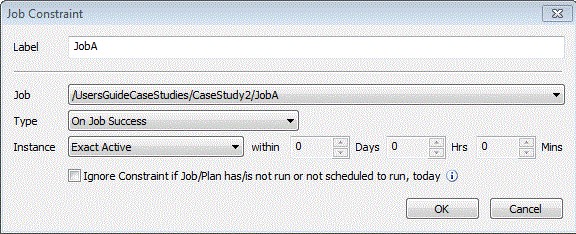
The information requested is to identify the Job or Plan that the current Job or Plan will be dependent on - and to populate other associated properties, described below.
Label: This mandatory field names the Job Constraint. This label must be unique within the Plan or Job’s usage. If <AutoAssign> is used, the label will consist of the Job or Plan’s label. For example, /CaseStudy2/JobA would yield a label of JobA (as depicted in the above image).
Job: This mandatory field contains a dropdown box listing all known Jobs/Plans, by name. Select the Job or Plan that the current Job or place will be depending on before it can run.
Type: This mandatory field indicates whether the specified Job must complete successfully (the default), must complete in failure, or just complete. Failure is a less common configuration, but there are scenarios where the current Job should only run when the dependency Job fails.
Instance: This field indicates how current the specified Job instance must be to consider the Job meeting the Type property. Possible choices are defined below.
Exact Active means either the currently active instance or the last scheduled instance. This is the default and most precise setting. Jobs or Plans that are executed within a single batch run
Exact Active Today Only refines the Exact Active scope further by limiting instance checking to “Today”. Today is defined as the standard 24 hour period beginning with midnight (unless this object is using Business Day Semantics” in which case the period begins based on the StartBusinessDay configuration property). The instance must have been created today, however, it does not have to actually begin execution today. This scope allows for Job/Plan constraints to be considered as part of a today’s business run even though the actual execution of that run could take several days. Note: This scope is only applicable when the target specified is within another Plan or batch run (i.e. outside the current batch run).
Last Completed means the last completed instance as specified by a user provided time period. When this dropdown is selected, the time control labeled “within the last” becomes active and you can set the days and hours/minutes as a time period for ActiveBatch to determine whether a completed instance meets these requirements.
Not Active means that the selected Job/Plan is not currently running. If the specified Job/Plan is a part of the workflow, the scope will be limited to current batch run. If the specified Job/Plan is not a part of the workflow, the scope is not limited and a simple determination is made to determine if an instance is active. The “Not Active” scope is very similar to “Exact Active” with the single notable exception that a check of the previously completed instance is not performed.
All Instances includes the preceding settings and expands the scope to include any instance of the Job that completed. This is the most flexible setting.
Ignore Constraint if Job/Plan has/is not run or not scheduled to run, today: By default, all constraints when specified must be met. This can be an issue when you need to constrain against an object in another Plan which may have a different schedule. For example, JobA, which runs daily, needs to be constrained against a Plan named “MonthlyPlan” however, as the name implies, the Plan only runs once a month while JobA runs daily. If a “normal” constraint is specified, JobA will wait even when it shouldn’t. This attribute, when enabled, refines the constraint logic so that a constraining Plan/Job that has not run, is not currently run or is not scheduled to run today; is ignored. Today is defined as the standard 24 hour period beginning with midnight. If specified, using the above example, JobA will only be constrained on the day MonthlyPlan is actually scheduled to execute. On other days, the constraint will be ignored. Please note that this attribute is ignored if the object specified in the constraint is within the same batch run
Note: If the constraint logic fails and the Wait, Check every... option is enabled, the recheck logic kicks in. The system reevaluates the constraint logic based on the frequency and duration configured. The system also forces a reevaluation of the constraint logic as the Job(s)/plans(s) the constraint Job is waiting on complete. This is true because the system knows about its own jobs (it's not checking an external resource, like it does with a file, variable or dynamic (active variable) Resource Constraint). Therefore, as soon as the constraint jobs(s)/plans(s) complete, a constraint logic recheck occurs. The Job will not have to wait for the next recheck logic interval. This means that your recheck logic interval does not need to be overly frequent due to the forced recheck.
A file constraint allows you to specify what file(s) must be present or absent in order for the constraint to be met. To add a File Constraint, click the Add button, then select File Constraint. Alternatively, you can select an existing file constraint, then click the Edit button. Below you see the dialog associated with editing an existing file constraint.
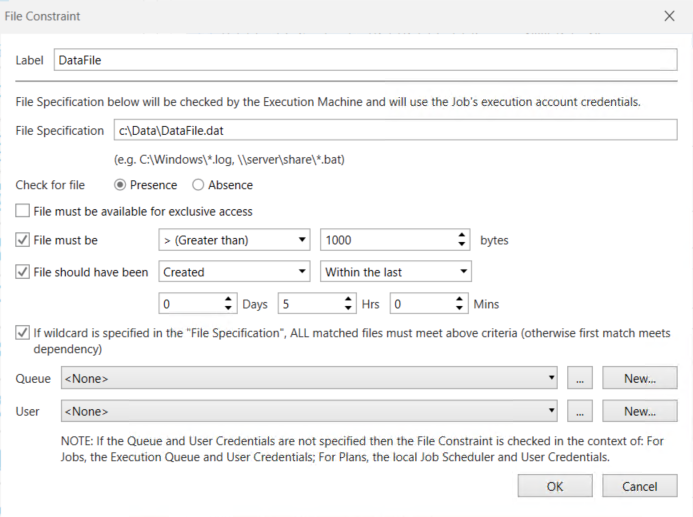
The information requested in this dialog box is primarily details about the file.
File Specification: This mandatory field indicates the file that the Job or Plan is dependent on, before it can run. The file specification must be complete and can represent a local or UNC file specification. You can specify wildcard characters. The characters must be added as per the execution machine’s operating system’s requirements. Please note that local represents the execution machine since all file dependency checks are performed in the Job’s security context on the execution machine. This means that you must have security access to the file. (Variable Substitution supported).
Check for File Present/Absent: This radio button indicates whether the file must be present or absent. The default is present.
The following checkboxes allow further refinement of the file constraint check.
If enabled File must be available for exclusive access means that no other process can be accessing the file. If a process is accessing the file, the dependency will fail. An example of when to use this might be expecting a customer to FTP a file into your production system. You don’t want to start the Job until the file has completed populating.
If enabled File must be at least nbytes means that the present file must be at least n bytes in size in order to successfully pass the file constraint check. This is particularly useful when a zero (0) byte file should be considered as a file constraint check failure.
If enabled File should have been allows you to perform a date validation on the specified file. You can choose Created, Last Accessed, Last Written dates as well as Before or Within and a relative day/time range. The relative time range can be expressed in days, hours and minutes from the initial file dependency check start time. This option allows you to discriminate between “old” files that just happen to still be present from newer files that should have been created.
If enabled the If Wildcard spec… option allows you to further refine wildcard processing by indicating whether ALL files must meet the above checking criteria or simply the first file should result in a dependency check failure. By default, the first file to meet the above criteria will cause the dependency check to succeed.
Queue and User properties may be specified when you want to check a File Constraint that is actually present on another machine (in particular, if that machine is another OS platform). The Queue property, if specified, indicates the Execution Queue (and machine) in whose context the file constraint is checked. Similarly, the User property represents a User Account object whose credentials are appropriate for the Execution Queue specified and will pass the authentication necessary for accessing the file and directory specified.
Note: By default, File Constraints are performed on the target Execution machine for Job objects and on the Job Scheduler machine for Plan objects. For jobs, file constraints are checked using the security credentials of the Execution User. For plans, file constraints are checked using the security credentials as noted in the Plan’s “Execution” properties. If this property is omitted, the file constraint will fail.
A Variable Constraint lets you to create an Active Variable from a built-in data source, then use the return variable value for comparison purposes, to determine if the constraint is met. To add a Variable Constraint, click the Add button, then select Variable. The following dialog appears:
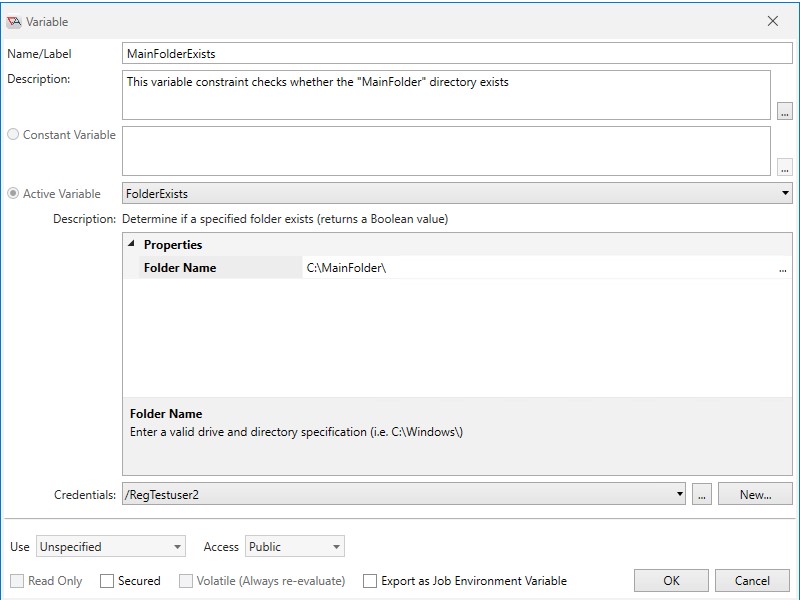
Using the above dialog, configure the desired Active Variable. Variable usage within the constraint should not be confused with variable substitution. In other words, when you configure variable(s) as a constraint, the system does not add the standard curly brace variable syntax in the Constraint Logic property (it just adds the variable constraint's label). Reminder: The label for any type of new constraint is automatically added to the Constraint logic when the constraint is saved.
In the above image, an active variable constraint is defined. MainFolderExists checks whether the directory C:\MainFolder is present. If it is, a Boolean value of True (1) is returned. Otherwise, a Boolean value of False (0) is returned. In this example, the Constraint Logic property would simply be: MainFolderExists.
Let's say another variable constraint is added (in addition to the above-described variable constraint) using the SQL query active variable. The query retrieves a database table record count that is then used to determine if there are enough records to satisfy the constraint. If the variable label is “RecordCount” then AND RecordCount is what would be added to the existing Constraint Logic by the system after saving the new variable constraint. It is up to you to enter the comparison portion of the constraint logic (since RecordCount doesn't return a simple True of False value). For example, the Constraint Logic property would look something like this: MainFolderExists AND (RecordCount > 5). Both conditions must evaluate to true to satisfy the constraint.
Note: By default, the AND operator is automatically added to the Constraint Logic property when you add multiple constraints. You can manually change this to another supported operator, such as OR.
Note: All Active Variable constraints require security credentials to access the data source. If the Execution User’s credentials (the default credentials used) are not appropriate for Windows, you must specify alternative credentials in the Variable constraint.
User Input Variable Constraint
A special constraint is an “Interactive” constraint. An Interactive constraint is used when you need to request information and/or pause a Job/Plan mid-stream.
To create an Interactive constraint, create a variable constraint as an active variable using the “UserInput” action.
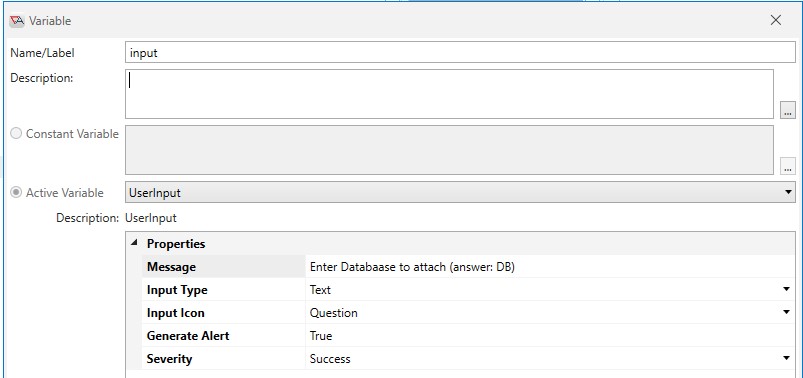
The above variable named “input” uses the UserInput action (an active variable type) which is used during a Respond operation to format and request data for the variable. The “waiting-for-the-information” portion is performed as part of the constraint. In the above example, the variable “input” requests “text” from the user - displaying a question (“Enter Database to attach…”).
Note: Proper use of the UserInput active variable requires that you allow some period for a Wait clause (Wait. Check every... property). This operation will not work properly if you fail the Job immediately on the constraint failure.

The variable “input” is checked, as part of the constraint logic” for the value of “DB”. Unless the user enters that value, the constraint will not be satisfied.
A Resource represents a finite value that is to be shared among other jobs and plans. When the object triggers, the Plan/Job attempts to access the resource it needs, based on how the Resource Constraint is configured. If it cannot access the resource, the instance will fail or wait, depending the constraint's failure logic (applicable to all general constraints).
ActiveBatch resources are numeric by definition. For example, the resource may be a static number that represents the maximum number of jobs of a particular type that can run at the same time. More dynamic resources might be the amount of free disk space a particular system has and the fixed amount needed by this Job. If the required amount of disk space isn’t available, the Job shouldn’t run. In order to configure a Resource Constraint, you would first need to create a Resource Object object, since you must specify one in the Resource Constraint, as depicted in the image below (see the Resource Object property).
To add a Resource Constraint, click the Add button, then select Resource Constraint. The following dialog appears:
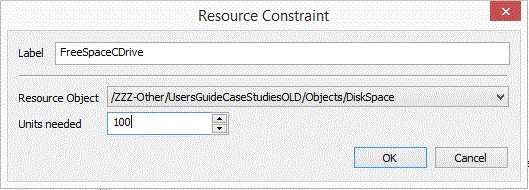
In the image above, the Resource Constraint labeled “FreeSpaceCDrive” references the dynamic Resource Object (named DiskSpace) which corresponds to the amount of free space on drive C: (in Megabyte units). This particular Job needs one hundred million bytes of free space (as per the Units needed property) before being allowed to run (assuming any other constraints are met). For Constraint Logic purposes, the system will add the label - FreeSpaceCDrive (after you click OK), and that is all that is needed (no comparison operation is required, since the "Units needed" is specified in the Resource Constraint itself). If the Resource constraint is met, the label FreeSpaceCDrive is equated to true, if not, false; when true, 100 (megabytes) is then subtracted from the resource.
Note: If the constraint logic fails and the Wait, Check every... option is enabled, the recheck logic kicks in. The system reevaluates the constraint logic based on the frequency and duration configured. When you are using a static Resource Constraint, the system also forces a reevaluation of the constraint logic when a Job that was allocated unit(s) has completed and returned the unit(s). This is true because the system keeps track of its static units (it's not checking an external resource, like it does with a file, variable or dynamic (active variable) resource constraint). Therefore, as soon as a Job returns its static resource unit(s), a constraint logic reevaluation takes place. The Job will not have to wait for the next recheck logic interval. This means that your recheck logic interval does not need to be overly frequent due to the forced recheck.
The Date/Time constraint lets you specify when triggerable objects should not run, even if a trigger occurs. Two types of date/time constraints are provided: Exclusion (List) and Calendar, as depicted in the image below.
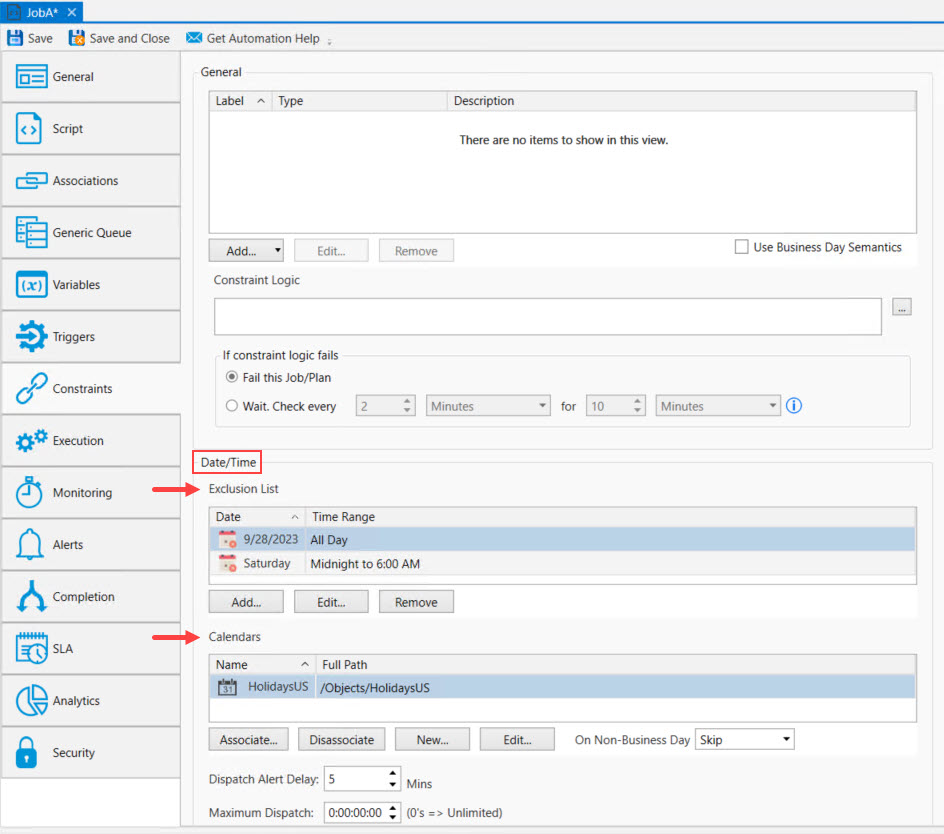
The Date/Time Exclusion List constraint allows you to indicate a day, specific date (or date range), and time(s) that indicate when a Plan or Job is not allowed to execute. This means that should a Plan or Job trigger on a date/time specified in the exclusion list, the Plan or Job will not execute. These exclusions are set on a per Job or Plan basis. The Calendar constraint uses the shared Calendar object to filter triggers. A common use to is add holiday dates to a Calendar object, then associate the Calendar to multiple Jobs and/or Plans. The holiday dates indicate when the Plan or Job should not run, even if a trigger occurs.
The exclusion list has two (2) properties: Date and Time. These are the date(s) and time(s) the Job/Plan should not run if triggered. The date can be a specific date or date range, or any day(s) Monday through Sunday. The time can be all day, or a time range (e.g. 1:00 PM to 2:45PM). Using the exclusion list, you could specify that a Job scheduled to run every 5 minutes should not run at 3:05 am. Or, not run on Mondays. The figure below is the dialog box that appears when you add or edit a Date/Time exclusionary period. You can have more than one exclusionary period for any given Job or Plan.
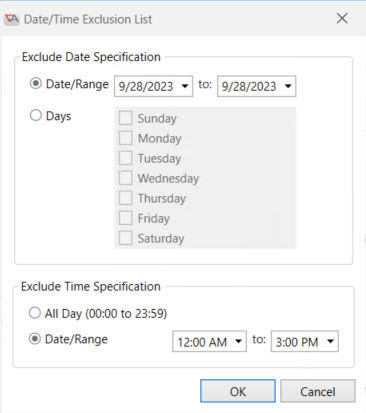
The Date/Time Calendar constraint is used when a Plan/Job is only allowed to execute on business days. The Calendar Object object acts as a filter constraining triggers to only operate on business days. Holidays and non-working days (typically weekends) would not be considered business days. Therefore, what you add to a Calendar object are non-business days and/or holidays. You can associate one or more Calendar objects as constraints to the Plan/Job.
As an example, assume a Job is configured to trigger Monday through Friday, using a Schedule object. A holiday is set to fall on a Monday. Add the Monday holiday to the Calendar object and associate the Calendar to the Job. When the holiday date arrives, the Job will not run.
Alternatively, you can also associate a Calendar object with a Schedule object. Please see a discussion about this in the Schedule Object object section. This topic only discusses how the Calendar object works when it is associated to a Plan/Job on the Constraints property sheet.
To add an existing Calendar object to the Calendars list, click the Associate button. An "Associate" window will pop up, allowing you to navigate to your desired Calendar object. Click the checkbox to the left of the Calendar name, then click OK. The Calendar will be added to the list of Calendars. You can also select an existing Calendar to edit it, or disassociate it. Additionally, you can click the New button, which will pop up a window allowing you to select the container to place the new Calendar in. After selecting the container, the property sheets for the new Calendar will be tabbed in the Main view. Configure the Calendar, then save it. The Calendar will be added to the Calendars list, and it will be visible in the container you previously selected.
On Business Day - This property is located under the Calendars list. If a holiday date occurs on a day that the object normally is triggered, you can opt to run the Job on a different day - which includes the next day or the previous day. You can also skip the run (the default selection). If you choose UseNext or UsePrevious from the dropdown list of options, the triggerable object will be scheduled to run on the previous or next business day. If it is already scheduled to run on the previous or next business day, it will run as usual and the next/previous selection will be ignored (it won't run twice).
This section discusses what happens to Constraints when an instance is restarted. Instances can be restarted automatically through Completion properties or via the Restart operation. When an instance is restarted, the following constraint rules apply:
The only variables that are re-evaluated are those marked as Volatile and those ActiveVariables that have never been re-evaluated before.
FileConstraint, ResourceConstraint and JobConstraint are also re-evaluated.
UserInput is only re-evaluated if the operator checks the “Use Latest Template Properties” checkbox on a Restart operation. Otherwise, the UserInput is considered as being met, if a value was entered, and no new input is requested as a result of the restart.
The Execution category specifies the Plan’s execution properties.
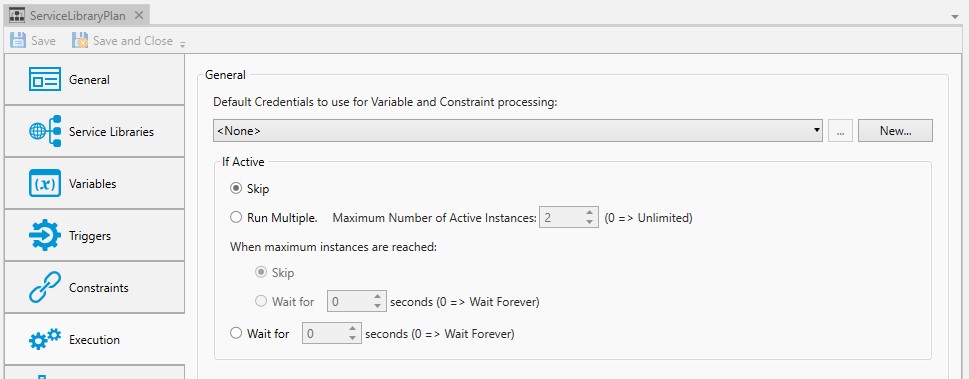
Default credentials to use for Variable/Constraints processing: This dropdown and related button (New) allow you to set default credentials when using Active Variables
If Active: This field indicates what action should be performed if an instance of this Plan is already running.
Skip: If selected, skip the execution of this instance. In other words, only one instance can be active at any given time.
Run Multiple: If selected, run the instance. This means multiple instances of the same Plan can be running. The additional value Maximum Number of Active Instances further allows you to indicate the maximum number of simultaneously running instances of the Plan. Zero (0) means unlimited. When maximum instances are reached, additional properties allow you to further refine your processing. You can elect to skip that run or wait for a period of time (in seconds) before the run will be skipped.
Wait for: If selected, this instance is to wait for a specified time (in seconds), before this run is skipped. While you can specify zero, we recommend you specify an actual value.
This tab controls the ability for ActiveBatch to monitor a Plan’s progress in order to detect an overrun or underrun condition. You can be alerted that a Plan is in an underrun or overrun situation, and optionally have the system take action against the instance. For an overrun, the Scheduler can automatically abort the Plan; for an underrun, the Scheduler can mark the Plan a failure.
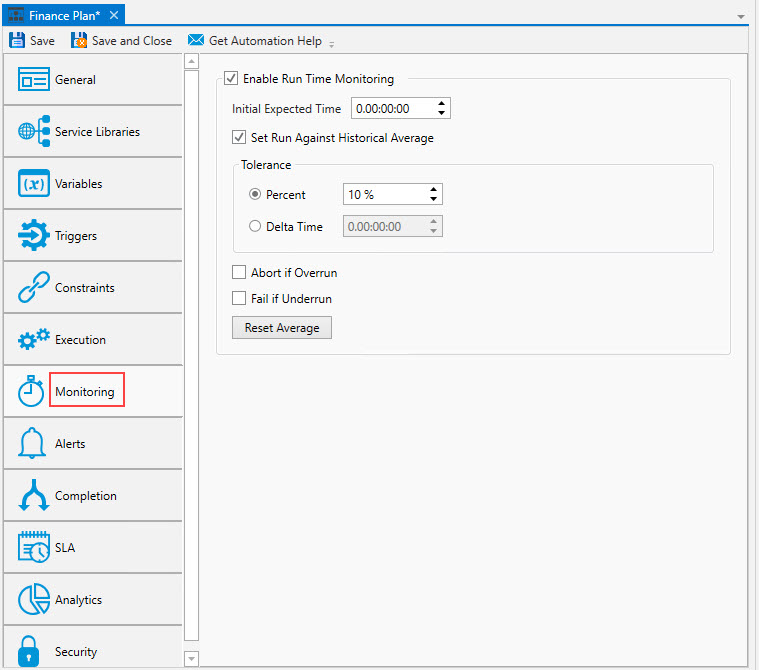
The example above is using the Plan's historical average runtime to detect overruns and/or underruns. It includes an allowable under/over tolerance of ten percent.
Enable: This section, when enabled, allows ActiveBatch to examine the Plan’s expected elapsed time and determine whether the Plan is operating as expected.
Set Initial expected run time: If selected, you can enter days, hours, minutes and seconds that represents the expected Plan’s elapsed runtime. For example, if you think the Job will run for 1 hour and 15 minutes, then enter the hours and minutes in this property. If you check the Set Run Against Historical Average field described below - this field (Initial Expected Time) is ignored (unless there is no average runtime yet - either because the average has been reset, or the Job is new and has not executed yet). As a best practice, use the Historical Average because a static run time (which is what this property represents) may not be as accurate (over time) as using the Historical Average.
Set run against Historical Average: If enabled, ActiveBatch will use the Plan's run time and average it against previous successful runs (aborted and failed Plans are not part of the average). This average will be used to determine if an underrun or overrun is encountered. Checking this box is recommended because the run time may change over time, and it will help prevent false overruns and/or underruns (which may occur if you only enter an initial expected time (a hard-coded value) that does not consider the average runtime).
Tolerance: You can specify a tolerance that will modify the initial or average elapsed time (for the purposes of Monitoring). This tolerance can be specified as a Percent or as a Delta Time. The Percent property means that the over or under time period is created as a percentage of the expected run time. The Delta Time property allows you to indicate an acceptable under/overrun based on elapsed time. You can enter the Delta Time in days, hours, minutes and seconds. The Delta Time is added/subtracted from the expected run time to determine the monitoring period.
Abort if Overrun: If enabled, ActiveBatch will automatically abort the executing Plan on an overrun condition. An overrun condition occurs when the initial expected time or average run time plus the tolerance time (percent or time) are exceeded. When aborted, the completion State will be Aborted, and the instance's audit trail will include a Runtime Overrun entry. Example: Average runtime is 60 minutes. The Percent is 50% (30 minutes). If the Plan runs over 90 minutes, it is considered an overrun.
Fail if Underrun: If enabled, ActiveBatch will change the completion State to failure if the Plan does not run within the low-end range of the monitoring period. That is, the Plan must run (at minimum) for the initial expected time or average runtime minus the delta. When failed, the State will be Failed, and the instance's audit trail will include a Runtime Underrun entry. Example: Average runtime is 60 minutes. The Percent is 50% (30 minutes). If the Plan runs for less than 30 minutes, it is considered an underrun.
Reset Average: Click this button to reset any historical average values that ActiveBatch is retaining. This is useful when you make changes to a Plan (e.g. add or remove Jobs) and want to start with fresh new statistics (because the new averages may be significantly different after the changes). Resetting the average can eliminate false underrun/overrun conditions.
If you wish to create an alert for overrun and/or underrun, these are the alert types you should use:
Overrun: Job/Plan Elapsed Time Overrun
Underrun: Job/Plan Elapsed Time Under Run
Below is an image of what you will see in the Instances pane when a Plan is configured to Abort on overrun or Fail on underrun. Taking action like this is optional - you may decide to only send out alerts, and let the operator determine what to do. It is up to you.

The Alerts category is used to establish alerts on the Plan-level. For example, if a Plan's SLA is breached or if a Plan fails, you can send out an alert.
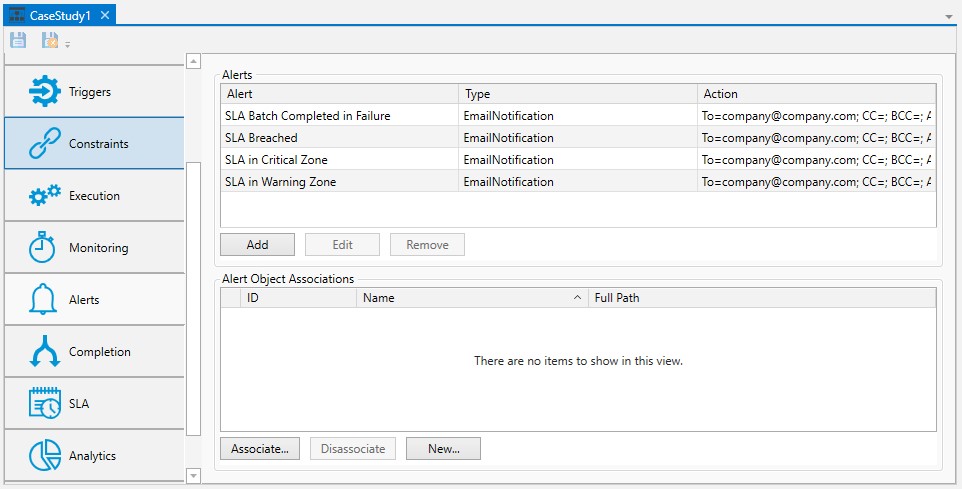
ActiveBatch allows you to specify alerts by either grouping alerts into an Alert object and/or by individually assigning Alerts to a specific Plan. In the above image, the alerts are individually assigned to the Plan. Individual Plan alerts must be changed on a Plan-by-Plan basis (if a change is required). The lower portion of the Alerts property sheet is used to associate an Alert object to the Plan. The benefit to using an Alert object is that you can change the contents of the Alert object and when doing so, the changes will automatically apply to all associated Plans (all the Plans using the Alert object). It is because of this reason that sharing an Alert object with multiple Plans is recommended over embedding them in the Plan itself.
Alerts:This area lists all Alerts associated with this Plan. The Alerts are specific for this Plan only. You may add, edit or remove Alerts by clicking the appropriate buttons.
Alert Objects: This area lists all Alert Objects associated with the Plan. The Associate, Disassociate and New buttons allow you to associate an existing Alert to a Plan, disassociate a selected Alert from the Plan, or create a new Alert. When you click the New button, you will be prompted for the location (Folder, Plan or root of the Job Scheduler) where the Alert object is to be created. After making that selection, you will then be presented with the Alert property sheets so you can configure the new Alert. When you save the new Alert object, it will automatically be associated to the Plan.
The Completion category of a Plan provides properties that concern the completion phase of a Plan. This includes Plan failure restart options, Plan history retention (how long to keep instance data), completion triggers (Jobs/Plans to trigger next), and the completion rule (what determines the success of a Plan).
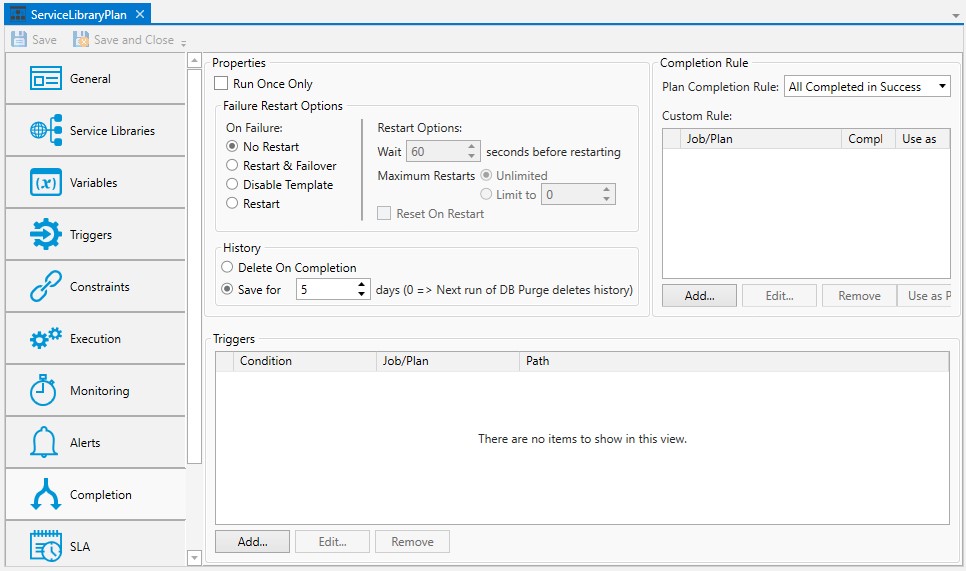
Properties:
Run Once Only: Checking this checkbox means that the Plan will execute only once. The first time a Plan is triggered after this property is checked, the Plan definition will be disabled by the system after the instance runs to completion (abort, success or failure). Disabled Plans, when triggered, will not run. The existing completed Plan instance can be restarted, either manually or automatically by setting the Plan's Completion/Failure Restart property. If desired, the Plan can be re-enabled via a right-click menu option, and triggered again. It will run to completion, and automatically be disabled by the system as long as the Run Once Only checkbox remains enabled. If a user wishes to allow the Plan to run regularly, they can disable Run Once Only by removing the check from the checkbox, saving the Plan, then re-enabling the Plan definition. The Modify security permission is required to update the Run Once Only property, and the Manage security permission is required to enable the Plan definition.
Failure Restart Options: This section determines when and if ActiveBatch is to automatically restart a failed Plan.
On Failure: This set of radio buttons indicates what should occur if the Plan fails. You may choose one of the following:
No Restart: Selecting this radio button (default) means that no special restart action should be performed if the Plan fails. The Plan will not restart, and it will appear as a failure in the various instances views.
Restart & Failover: This radio button, if specified, is treated like a Restart (see below) since a Plan instance cannot be associated with a Queue (where a Queue is required to support the failover concept). Restart & Failover is applicable to a Job's restart options - since Jobs are associated with a Queue.
Disable Template: Selecting this radio button causes the Plan definition to be disabled if the Plan instance completes in error. The reason for this option is you may wish to investigate why the Plan failed and not have it run again until a reason for the failure is identified. A disabled Plan template (definition) will not run until re-enabled. Please note that if the Plan instance (that failed) is restarted and succeeds, the Plan definition will automatically revert back to enabled.
Restart: Selecting this radio button allows a failed Plan instance to be restarted. This will restart the Plan from the beginning (start the entire workflow over again).
Restart Options:
Wait: If non-zero, the Job Scheduler will wait the specified value (in seconds) before restarting the Plan. By delaying the restart, whatever resource exhaustion or other temporary condition that occurred (resulting in the Plan failure) may have ended.
Maximum Restarts: The radio buttons allow for an unlimited number of restarts (not recommended from a practical point-of-view) or a specific number of restarts (the acceptable value range is 1 to 999). The maximum number of restarts controls the total number of restarts attempted for this instance.
Reset on Restart: This checkbox determines whether Active Variables
History: This section determines the period of time that you elect to keep a Plan’s instance history.
Delete on Completion: This option, when selected, indicates that the Plan’s instance history is to immediately be deleted and removed from the database. This is useful when you are running the same Plan many times and the actual Plan history would be burdensome or otherwise obscure other more important Plan history. Please note with this option enabled, a Plan will not appear in any ActiveBatch reports.
- Save for: This option, when selected, indicates how long a completed Plan’s history is to be retained within the ActiveBatch backend database. The value specified is defined in days, and an acceptable range is 0 through 366. A value of 0 indicates that the next scheduled running of DbPurge will delete the Plan’s history.
Completion Rule: This section allows you to specify which Jobs and/or Plans should signify the completion of the Plan and what exit status should be used to make that determination.
Plan Completion Rule: This dropdown provides three (3) rules: All Completed in Success (factory default), Last Completed and Custom.
All Completed in Success: This means that all Jobs/Plans that have actually run must run successfully in order to mark the Plan a success. If you have nested Jobs and/or Plans that never ran (were left in a “Not Run” state) after the Plan was done executing, those instances are ignored using this rule. That is, only run Jobs are considered. "Not Run" could be expected and by design, and therefore not necessarily indicative of a failure. This is especially true when there are completion triggers (configured within the Plan) that branch due to an upstream Job or Plan's success or failure. For example, you may have a workflow such that if JobA succeeds, it will trigger JobB. Alternatively, if JobA fails, it will trigger JobC. In this scenario, JobC will be in a "Not Run" state if JobA runs and does not fail. JobC would be ignored and not considered when determining the success or failure of the Plan when the All Completed in Success rule is used.
Last Completed means that the last Job/Plan that runs to completion denotes the Plan’s status.
Custom allows you to specify precisely what nested Jobs and/or Plans should be considered for determining the Plan’s completion status. Custom is the most exact rule because you specify the Job(s) or Plan(s) that must complete (i.e. run) - and how they must complete (e.g. successfully), in order to mark the Plan a success.
When Custom is enabled, three (3) columns are present in the Custom Rule table: Job/Plan, Completion Status and Use as Plan's Exit Code.
Job/Plan This is the Job/Plan name that runs within the Plan you are currently configuring this rule for. Any Job or Plan selected and added to the Custom Rule must run, and must end in the state specified (Completion Status), in order to mark the Plan a success. Any Job/Plan not added to the Custom Rule is not considered (is ignored) regarding the overall success of the Plan. As example, if you have 5 Jobs in a Plan, and only 1 Job is added to the custom rule (and that Job must succeed), if that Job both runs and succeeds, the entire Plan will be marked a success, and the other 4 Jobs are ignored.
Completion Status: This is the final State that the Job or Plan must complete in (Aborted, Failed, Succeeded) for the Plan you are currently configuring to be marked a success.
Use as Plan's Exit Code: This column indicates which specific Plan and/or Job's exit code should be used as the exit code for the Plan you are currently configuring this rule for. Click on a Plan or Job in the Custom Rule list, then click the Use as Plan's Exit Code button. A True value indicates that the selected Job/Plan's exit code will be assigned as the Plan's exit code. A false value means the selected Job/Plan is not used for the Plan's exit code. Only one Job or Plan in the list can be used as the Plan's exit code. Plans can (optionally) trigger other Plans or Jobs using completion triggers, and completion triggers support an exit code as the reason for a downstream trigger (e.g. If PlanA exits with a code of 10, trigger PlanB). Hence the ability to assign a Plan an exit code - it can be used in the Plan's completion trigger, if desired.
See below the image you will see when you Add a Job or Plan to the Custom Rule list.
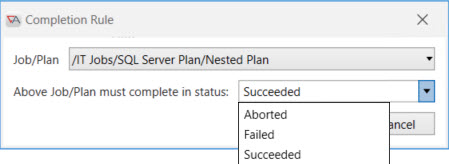
If the Plan Completion Rule is set to Custom, the above dialog is used to select the Plan/Job (that resides with the Plan you are currently configuring this rule for) and the status it must complete in for this Plan to be marked a success.
The Job/Plan dropdown provides a selection of the nested Plan/Jobs.
The Job/Plan must complete in status - Aborted, Failed, or Succeeded. The status selected is the final status the Job or Plan must end in - in order for the Plan to be considered a success.
Note: The Custom Rule must evaluate to "True" for the Plan to be marked a success. It may be counter-intuitive that a Job has to fail or abort for the Plan to be considered a success, but ActiveBatch offers flexibility in this area to address different scenarios.
The Triggers section allows you to specify which Job(s) and/or Plan(s) should be triggered when this Plan completes. You can refine the trigger to success, aborted, failed, or a series or range of exit codes.
Three (3) buttons are available for you to add, edit or remove a Completion Trigger. The display provides two (2) columns: Name (or Label) and Condition. The Name (or Label) identifies the Job (or Plan) that you want to trigger. The Condition identifies the criteria that you want to use when your Job completes to determine which triggers are executed.
This Service Level Agreement is used to associate an Availability Service Level Agreement (SLA) to a Plan.
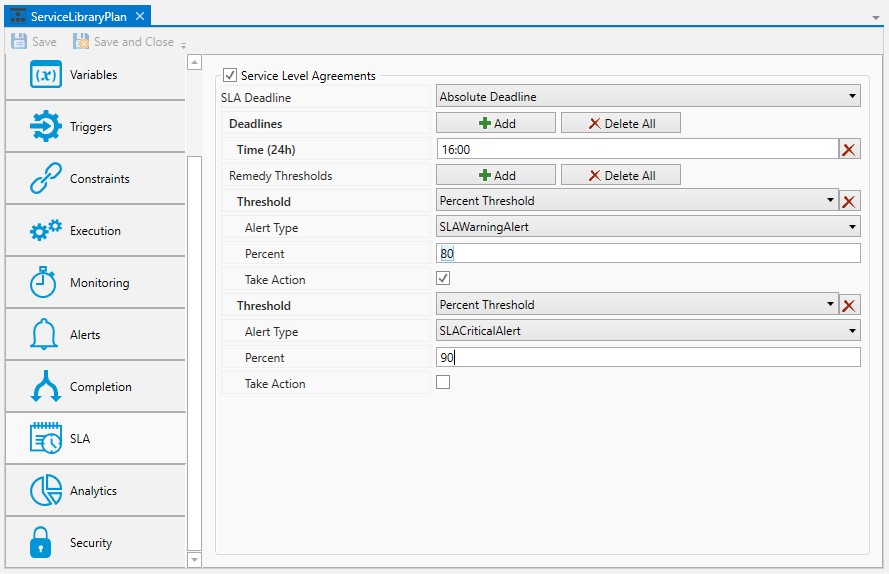
An Availability SLA is used to indicate to ActiveBatch when a Plan (and its associated workflow) must be completed successfully by a specific time deadline. If the Plan has not been completely successfully by its deadline time, the SLA is considered to have been breached.
Two aspects need to be defined for an Availability SLA: Deadline and Remedy. The Deadline can be expressed as a list of absolute time(s), for example, 1300, or as a single relative deadline (duration) in which a deadline is calculated when the Plan becomes instantiated (meaning when a Plan instance is created). Remedy refers to either an alert that is to occur when a percentage of time has taken place and the Plan is still running and/or an action. “Action” refers to a series of steps that are taken to prevent the Plan from breaching its SLA. For more information concerning Service Level Agreements please Service Level Agreement
Deadline: This property indicates when the Plan must have successfully completed by. Absolute Deadline indicates the actual deadline clock time (hh:mm). Relative Deadline is also a time (hh:mm) which is added to the Job instance instantiation time to calculate a deadline. If Relative Duration is used only a single time period can be specified. For Absolute Deadline you can specify one or more clock times (hh:mm) by clicking on the Add button. Individual clock times can be removed by clicking on the small stylized “x” that appears on the right. The Delete All button can be used to start over and remove all clock times specified. When a collection of deadline times has been specified the deadline time closest to your scheduled or begin instance time that has not yet expired is used.
Remedy Thresholds: This collection of properties allows you to indicate either a percentage of time (deadline minus instance created) or an absolute time. When this threshold is created you can specify a type of warning which can form an alert. In the above figure, if the Plan is still running after 80% of the elapsed time prior to deadline is reached, then an SLA Warning alert should be indicated and actions taken. Likewise, if the Plan is still running after 90% prior to deadline, then an SLA Critical alert should be indicated. Please note that once “Take Action” is initiated it cannot be canceled.
Analytics provides statistical information, audits and revision history.
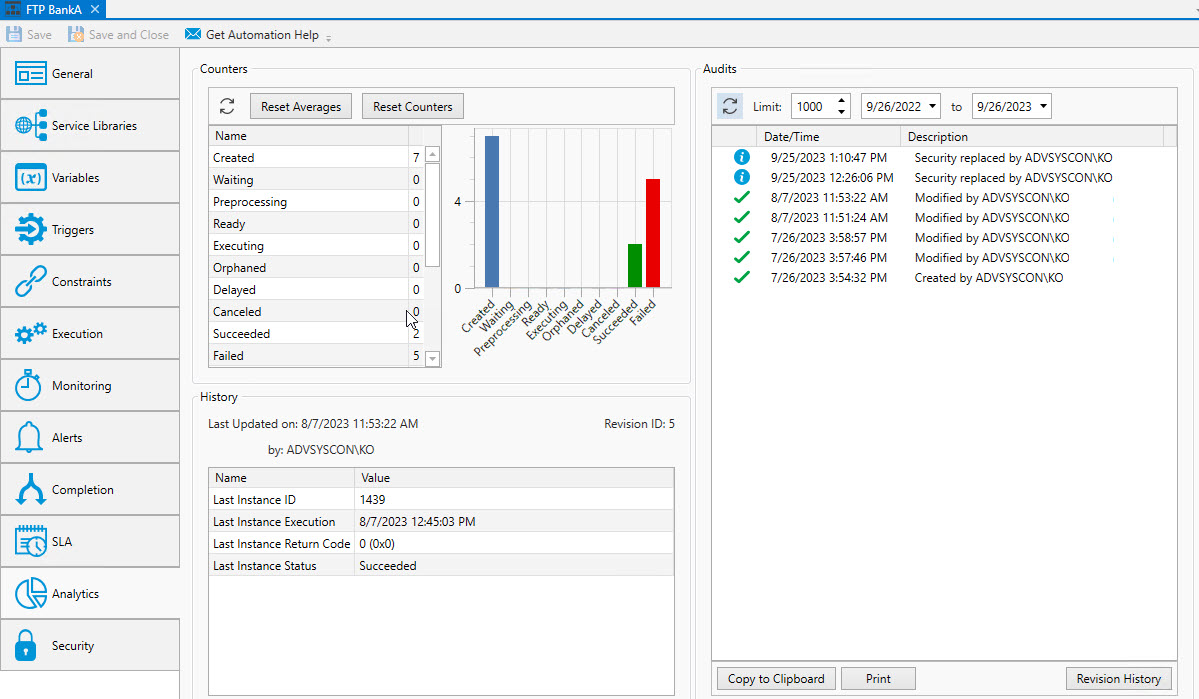
The Counters above are specific for this Plan definition. For example, you can see how many times the Plan was created, how many times it succeeded or failed, etc. You can also see if the Plan is currently executing or in some other active state. The Reset Counters button allows you to reset the counters back to zero. The Reset Averages button allows you to reset the averages (elapsed run-time) back to zero. The Refresh icon retrieves the latest set of counters.
The History section provides a variety of information such as the Plan's current Revision ID, when the Plan was last updated and when it last ran.
The Audits section allows you to view the audits that are created when the Plan definition is initially defined. Changes made to the Plan definition are audited as well as the creation some Plan instances (not all Plan instances created are recorded in the audit history). Event driven triggers are recorded, and so are triggers using the trigger method (accessed via the UI and/or command-line, for example). Scheduled triggers are not added to a Plan's audit history. Audits covering the Plan instances themselves can be found on the individual instances.
The Audits panel includes controls that allow you to filter the audits based on start and end dates. You can also limit the audits retrieved to a maximum number. The refresh button allows you to retrieve any audits that were generated after this dialog was initially displayed.
Each audit is contained in a single line in date and time sequence. Audits are read-only and cannot be modified. An icon appears at the beginning of each audit to help visually signal the severity of the audit. If an audit policy
Opening an audit item (by double-clicking on the item), depending on the nature of the audit, will sometimes reveal additional information concerning the audit.
The Copy to Clipboard button copies the contents of the retrieved audits into a copy buffer that you can later paste into a document or other program.
The Print button allows you to print the retrieved audits.
The Revision History button allows you to select one or more audits concerning changes made to an object and perform a difference operation between the selected revised objects.
This tab is where object security is configured. Security in ActiveBatch mirrors how security is granted using Windows security. That is, permissions applicable to the object (Read, Write, Modify, Delete, etc.) are Allowed or Denied for the Active Directory users and/or groups assigned to the object.
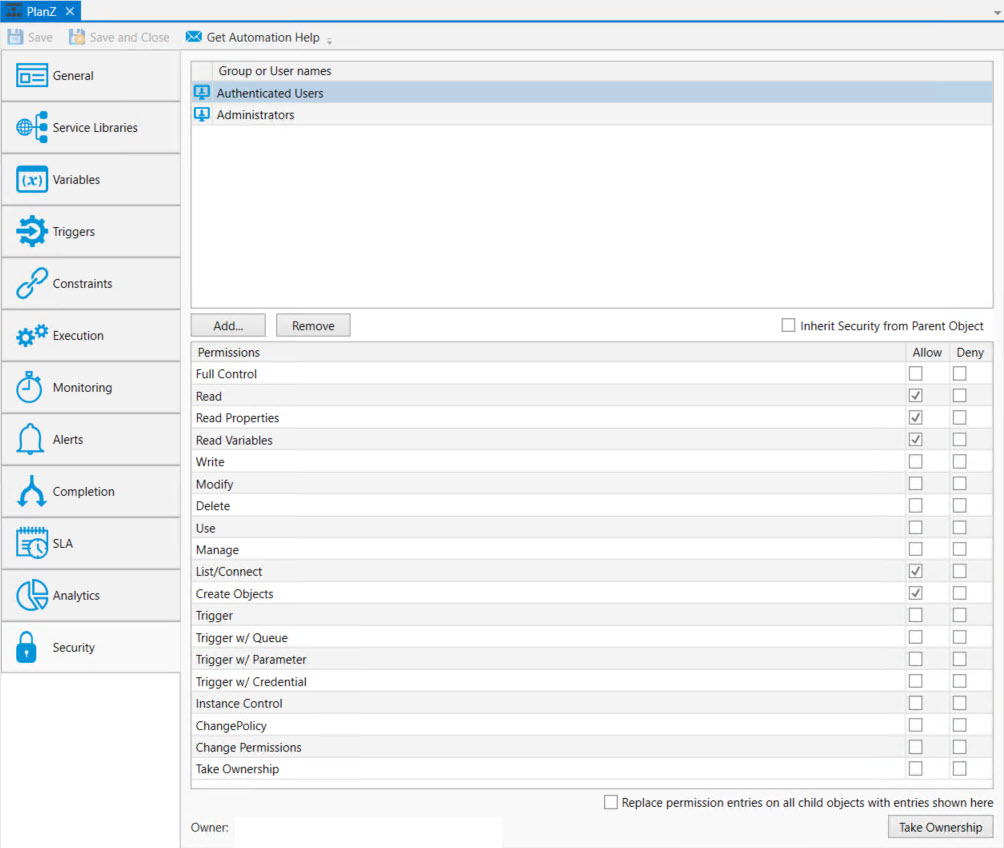
Note: The Owner field has been omitted in the above figure intentionally.
The table below lists all security access permissions, using Windows conventions, that you will see on the a Plan's security property sheet.
Access Description Read
Account is allowed to view any properties/variables of the Plan (Read implies both Read Properties and Read Variables).
Read Properties
Account is allowed to read the properties of the Plan.
Read Variables
Account is allowed to read the variables of the Plan.
Write
Account is allowed to write to the Plan.
Modify
Account is allowed to read/write any properties of the Plan (Read + Write).
Delete
Account is allowed to delete the Plan.
Take Ownership
Account is allowed to take ownership of the Plan.
Use
Account is allowed to use the Plan and to create a reference to it.
Manage
Account is allowed to perform operations on the Plan (Enable/Disable or Hold/Release).
List/Connect
Account is allowed to list objects in the Plan, and/or connect to the object as a virtual root.
Instance Control
Account is allowed to perform operations on the instance (Abort, Pause/Resume, Restart, Force Run, Force Completion Status, Delete, etc.). Account can also take ownership of an Alert in the Alerts view and respond to it.
Create Objects
Account is allowed to manipulate objects contained in the Plan. This includes add, delete and move. The account must also have the necessary corresponding permissions on the underlying object itself.
Change
Permissions
Account is allowed to change permissions (set security) on the Plan.
Trigger
User may trigger Plan.
Trigger and
Change Queue
User may trigger Job and direct Job to execute on a specified Queue. Applicable on Push Down or Inheritance of Security only.
Trigger and Change
Parameters
User may trigger Plan and specify new or existing ActiveBatch variable(s) that override any specified at the Job/Plan level.
Trigger and Change
Credentials
User may trigger Plan and specify new security credentials for the Plan’s variables that require security credentials
Full Control
Account may issue all of the operations mentioned above.
In the above table, the Trigger and Change Queue permissions includes this statement: Applicable on Push Down or Inheritance of Security only. This means the security permission is not applicable to the Plan object itself. You cannot trigger a Plan and "Change Queue" because only Jobs are associated to Queues. The permissions is there because child objects in the Plan may obtain their security from the Plan (which is an option, not a requirement), and if they do, all permissions related to all object types must be present on the Plan's security property sheet. The reference to "Push Down" and "Inheritance of Security" are the two ways that child objects can obtain their security from the Plan. See below for more details.
Push down - Push down provides you with a way to propagate the Plan's permissions to the objects nested within the Plan. This means the Plan's existing child objects (and nested child objects) security will be removed, then replaced to match the Plan's security groups and/or user names and their associated permissions. The "Replace Permission entries on all child object with entries shown here" checkbox (as depicted in the above image) enables the push down action. Note! You will only see this property (and be able to use it) if the Plan's "Inherit Security from Parent Object" property is not checked.
When you check the "Replace permission entries..." checkbox, then save the Plan, the push down action occurs during the save. Therefore, the "Replace permission entries..." checkbox is an action item, not a static property setting. Since it is an action item, the next time you edit the Plan's security property sheet, the property will be unchecked, by design. You can use this feature as often as you would like, since updating Plan security does not automatically update child object security, unless child object security is inheriting security from its parent object.
Inheritance of Security - Child objects inherit security from its parent container when the child object's "Inherit Security from Parent Object" property is checked. This property is on the security property sheet of all user-defined objects, including Plan and Folder objects (they can inherit their security from their parent container). In addition, when Inherit Security from Parent Object is checked on the Plan, you will see another property named "Enable inherit security on all child objects". This property allows you to push down "inherit security" to all child objects (and nested child objects) within the Plan. This process removes existing child object security and replaces it with inherit security by enabling the "Inherit Security from Parent Object" property for each child object. When you check the "Enable inherit security on all child objects" checkbox, then save the Plan, the update of all the child objects' security will take place. Therefore, the "Enable inherit security on all child objects" checkbox is an action item, not a static property setting. Since it is an action item, the next time you edit the Plan's security property sheet, the property will be unchecked, by design. You can use this feature as often as you like.
Note: Pushing down security (users/groups) is an option that allows you to quickly update child object security within a container. It is more commonly used when a customer decides existing objects created using factory default security
Note: The easiest approach to managing security would be to determine what container(s) you need to set security on, add the desired users and/or groups and grant the appropriate permissions, then create a default policy
To add, edit or remove security access permissions requires the user to have “Change Permissions” access to the object.
The owner of a Plan is the user who first creates the Plan. The owner of a Plan is implicitly granted Full Control access permission, and this cannot be changed. To change ownership, click the Take Ownership button and confirm the resulting dialog. You can also take ownership by right-clicking on the Plan in the Object Navigation pane, then selecting Advanced > Take Ownership. The new owner is automatically granted full control of the object and this cannot be changed. Note: You must be granted Take Ownership permission to take ownership of an object.
The Deny permission is generally used for users who have been granted access based on a group membership, but there is a need to override this for a user. Deny takes precedence over Allow.
When the "Inherit Security from Parent Object" is checked, you cannot add, remove or modify security permissions for the existing users/groups. Therefore the following discussion assumes this property is not checked.
To add new access permissions, click the Add button and follow the dialog as discussed below under the Add Security Dialog heading. To remove an existing account name, select the listed account and click the Remove button. To change existing access permissions, select the account and then select a new Permission Type (either Grant or Deny access) and a new Permission (one of the access permissions listed in the above table).
Add Security Dialog
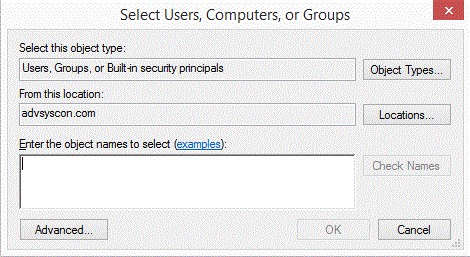
The dialog is similar to that of other Windows objects, and leverages Active Directory services. The Locations button allows you to select either the Job Scheduler machine or any applicable domain. Clicking the Advanced button allows you to search for specific users and/or groups. Alternatively, you may enter object names (a user or group) in the large edit box. Clicking the Check Names button allows you to validate the accounts. Click the OK button to add the selected Account to the object’s security list.